How to stream on the Justin.tv (twitch.tv) channel
• Where to start?We will need only two things: to register on Justin.tv and a screen streaming program. In our example, we will look at two programs: XSplit and OBS.
• Registration on Justin.tv (twitch.tv)Follow this
link and register your login. Keep in mind that your channel will be named the same as your login, and it will look like this:
http://ru.twitch.tv/ваш_логинTo answer immediately: twitch is the same as justin; it's just that now streams are by default hosted on this domain. If you are not satisfied with the Russian language (and everything is translated by Google), simply write en instead of ru in the 3rd level domain, i.e., en.twitch.tv
After registration, you need to go to your channel; the link was provided above. That is where your streams will take place; the link leads directly to the channel itself. Playback will start automatically, which is not a good thing—I'll explain why later.
• Xsplit and how it worksHere you can register and buy the program.
Now let's proceed to configuring XSplit. Launch the program. The following window should appear before us

Click on
Broadcast in the top menu, then (I will use an arrow
->)
Edit Channels...The program might lag for a moment, after which it will open a window that lists only one pseudo-channel called Local Recording. For those who are not fluent in English—this is simply a local recording, meaning without streaming.
We need to add our channel. To do this, we need to add the Justin plugin, because most likely it's not there. Click
Add... -> More... and look for Justin/TwitchTV in the list. After that, we need to install it (click on the text and look for Install, then wait a while—you can take a smoke break or drink some tea, for example). After installation, close the current window and click
Add... again, where the
Justin/TwitchTV item should now appear. Click it, and the following window should appear
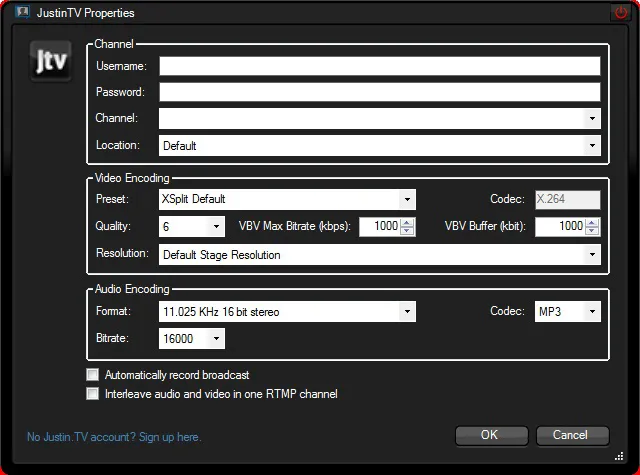
In the
Username and
Password fields, enter the login and password you used when registering on justin.tv; if everything was done correctly, the
Channel field will be filled automatically. Leave the
Location field unchanged.
And now the most interesting part begins. This is where it comes down to something that no one really knows—the capabilities of their own computer. It's hard to say, as everyone has different machines. For example, I have a quad-core processor, 8gb of RAM and a 2gb video card. And for me, the settings can be quite serious, but unfortunately not everyone is like that, so you'll have to think it through a bit here. To the left of the OK button, there should be a
Test Bandwidth button, which will help us determine the average value of our bitrate (internet quality). From the number in the test, subtract about 100, round it, and enter it in the VBV Max Bitrate field. For 20 Mbps, 1000-1100 is optimal. Leave
Quality unchanged. Sound—if you plan to stream with commentary and/or music. If not—set the lowest settings, because despite disabled speakers and microphone, communication with the server via the audio channel still occurs, meaning audio data is transmitted, which takes away speed from the video transmission. For a weak sound card, the settings shown in the screenshot will work. The higher the frequency, the more interference. Remember this. :-) Now exit all windows back to the main one.
File -> Add screen region..., then click anywhere on the screen. A mini-window with the stream will appear in the main window. You need to click on this mini-window, then hold "1". Now the entire screen is being streamed, but without capture.
View -> Resolution and set it to 1280 x 720 (don't go higher).
View -> Frame Rate and set it to 30.0 FPS – the optimal option.
View -> Scale viewport and choose 20-30% - you will see the result yourself
That's it, configuration is complete. To start streaming, you need to click
Broadcast -> Your channel name. In a few seconds, your screen will be streamed to your channel on justin.tv (but via the link to twitch.tv)
In the lower left corner, an item Screen Window "blahblahblah" will appear
Right-click it and check the box next to
Capture layeres windows. Now, in theory, windows should be captured.
If you are streaming with sound, do not try to watch your own stream. Obviously: it will go into a loop (you might have observed this already with the image, but not with the sound—this is much scarier! :)), the sound will gradually overlap itself and everyone will find it unpleasant to hear an incredible screech in their speakers. Without sound, everyone will see a receding stream within a stream within a stream within a stream...
By the way, turning off the stream is the same as turning it on:
Broadcast -> Your channel name :-)
Troubleshooting:
If you experience stuttering (and not network-related lags), reduce the resolution.
If the stream lags, there are several ways to fix this.
1. Reduce the
Quality parameter from 6 to 5, for example.
2. Lower the maximum bitrate (VBV Max Bitrate).
3. Change your internet :)
4. Experiment with numbers to achieve the optimal balance between image quality and in-game lags.
• Open Broadcaster SoftwareDownload the program
from here, launch it. The following window appears before us:
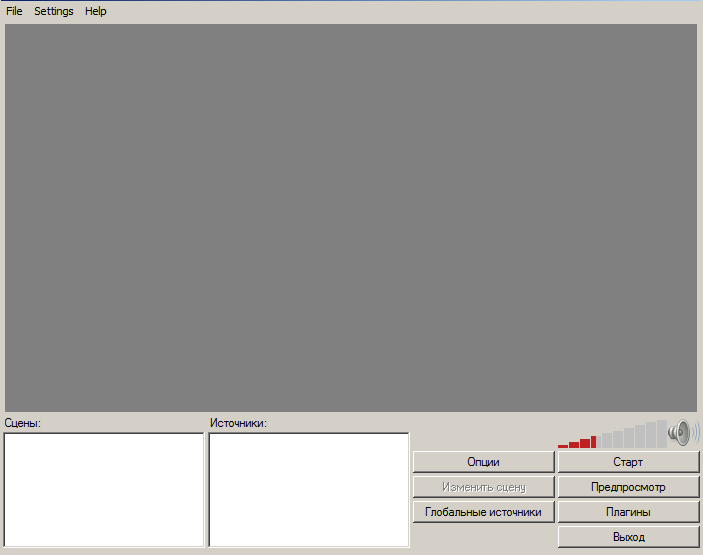
The first thing to do is add a scene. In this program, this is not done automatically, so we need to add it manually; otherwise, nothing will be streamed. In the lower left corner, we see a list (a white rectangle—it's empty, but nonetheless it's a potential list :-)), right-click -> add scene. Name it as you like. The next thing we need to do is add a source, i.e., what we will be capturing. There are several options here; I will consider one because it is more convenient. Open Heroes in windowed mode and minimize them. Then click the button
Global Sources -> Add -> Window Capture. Name it, for example, Heroes. A window appears before us where we have to choose what exactly we are capturing. There are two options: either the entire monitor, set by default, or window capture. In the
Process dropdown list, look for our running Heroes. If there are none—click the refresh button and select Heroes.
So, almost everything is ready for streaming. Now it remains to configure the data transmission. Open options, then the
Streaming tab. This is where your stream settings are set. I recommend going to Speedtest.net and testing your
upload speed. If it's 5-10 mb, set the maximum bitrate and buffer around 1500. It can be slightly less. If less than 5, set no more than 1000. If more—set 2000, but in that case, the setting described below must correspond. Set audio to no more than 192 kbps, any codec. Set quality to your taste from 6 to 10; there is practically no difference. I recommend 7 for mid-range PCs and 10 for powerful ones. For weak ones, 5-6, or even less.
Open the
Video tab. Here you need to set the number of frames per second, i.e., FPS. The recommended value is 25-30, but if you are an experienced user, this recommendation is not for you. Heroes is not a dynamic game, so 25 frames are usually enough, but you must consider freezes and the weak internet of those watching the stream. Therefore, a universal approach is needed, which I unfortunately cannot share, because it is—the unscientific "trial and error" method.
Open the
Advanced tab. Here you can set the preset settings. By default, it should be Veryfast. In principle, the fastest (ultrafast) will produce a very blurred image but without any breaks. i.e., as if you are playing Heroes on your own computer, no lags. By reducing this parameter, better quality can be achieved, but with lower data transmission speed, meaning it will lag slightly. I recommend Medium or fast for powerful PCs, and Veryfast for everyone else.
In the
Audio tab, the microphone you will use should be selected. More about microphones below.
And the last and main setting. Select the
Streaming tab.
Mode—live stream, streaming service - JustinTV/TwitchTV. The channel name will be set automatically. Follow this
link (you must be authorized on Justin.tv); in the window that opens, look for the key that needs to be pasted into the
Play path/Stream Key field of our program. The server will be selected automatically; the Dashboard link field can be left blank (you can paste a link to your channel there to quickly access it with one click from the program). Leave all other settings as default.
That's basically it, configuration is finished. Now to start streaming, you need to press the
Start button; the stream will start automatically. Keep in mind that we have captured a specific window, so if the Heroes3.exe application is not running (i.e., the game is not started :-)), a black screen will be streamed.
Unfortunately, the program cannot stream only one thing. More accurately, there was a hint at this, but the capture method is not the best; the program captures the area with our window, and any open windows remain inactive behind our Heroes. As soon as you go to open, for example, some website—everything will be displayed in the stream but within a frame limited by your Heroes. i.e., if you use Heroes in windowed mode with a resolution of 864x664, then exactly this area will be displayed. It can be placed in the center by right-clicking on Heroes (or your name) in the
Sources list in the main program window.
• Microphones and additional settings (example for XSplit).
There are several ways to stream with audio and commentary.
1. You have a built-in microphone in your laptop and also built-in speakers.
2. You have an external microphone and built-in speakers.
3. You have an external microphone and speakers.
I'll start with the first case, since I have a laptop with built-in speakers and a microphone, and almost always stream from it rather than a PC (I don't like sitting at a desk for gaming). How does it work? Almost all modern laptop models have a decent sound card with a stereo mixer. However, in most cases, the stereo mixer only works with an external microphone; I failed to configure the internal microphone and speaker system to work together. Therefore, they will have to be used independently of each other, which means the stereo mixer will be of no use to us. But if it is supported on your device—read the second point.
In the main window, click
Broadcast -> Edit channels..., then open the
General tab. Here we have general settings and microphone settings. In the general settings, I recommend checking the box next to
Hide from Screen Region; this will allow you not to stream the window of the program itself. In theory. :-) Then move to audio. In the dropdown list, something like
Built-in Microphone System should be selected; it may be called differently, but the point is that it's not an external microphone and not a stereo mixer. In amateur hardware sets, there will be no more than three items in this list, so even by elimination, you can select the necessary microphone. Now you can adjust the microphone volume, but I want to note that there will inevitably be an echo: various noises, music (if enabled), and so on. An acceptable option is to turn off the sound in the main window and turn on the microphone when you want to comment on something. This can be done simply by clicking on the
megaphone icon (attached a link for those who forgot or don't know what it is) and also clicking on the microphone icon. When the speech is finished—do the opposite action.
Now, if you have any software for your sound card installed on your computer—try digging into its settings (this can also be done using Windows tools:
Start -> Control Panel -> Hardware and Sound -> Sound -> Recording (tab) (directory written for Vista and 7)), I recommend enabling only noise suppression; other settings heavily muffle speech along with noises and also distort it, so your voice will sound somewhat otherworldly.
2. In the case of an external microphone, a stereo mixer can be used. Its operating principle is simple: at a value of 50, the sound from the speakers and microphone will be at the same level. Accordingly, if you want to comment over a musical background—set the speaker volume lower and the microphone higher. In this case, we will need to select specifically the stereo mixer as the output device in the General tab (broadcast -> edit channels). Just like in the previous example, you can also just select an external microphone here; then, the sound will be like a laptop combo: built-in speakers + microphone, and the sound will be far from the best. The sound settings in point 2 will be exactly the same.
3. An external microphone is connected exactly as in the second point, but in this case, the source of sound will be external speakers. Their operating principle is the same as headphones, so it's possible that you won't be able to turn on music in the stream, even though only you can hear it. I know how to make both the speakers and microphone act as output for the stream, but at the same time, I know that default amateur equipment is designed such that using standard Windows tools will give you an unearthly squeal in your speakers and, therefore, the sound will be simply disgusting. Thus, unfortunately, I won't come up with anything special. There is only one option—connect the microphone and try to catch the echo from the speakers. The sound quality will depend on your microphone. For 50 rubles, you'll get an MP3 around 30-40 kbps. Decide for yourself if you need it or not.
P.S. If I messed something up—please correct me.
Happy using, victories and beautiful streams!




 Kilgor

