Skip to content

Posts from Hall of Fame of our best Heroes!

Hall of Fame Closed Topic
No ratings yet — be the first to rate!
User Avatar
19 years ago
Auto-translated
Ladies and Gentlemen,
Welcome to our School of Mastery.
This thread will feature the best descriptions of tournament maps for HMM3 offline tournaments!
So, let's begin:


MAP DESCRIPTIONS FOR "REBIRTH"
AT THE 1ST ANNUAL "BEST OF THE BEST" TOURNAMENT


Dmitry_A_S


Came, saw, left a trail or 36 days later

Let's start with the map objective. You need to collect the power of the father of dragons, which requires completing all quests, or alternatively, destroying all opponents. I think it goes without saying that the first option is easier and therefore faster. So, we collect the power of the father of dragons.
The main hero in my walkthrough was Dessa. Hire Dessa with the intention that Jeddit will appear after her (Alamar would have been ideal, but I couldn't "score" him). Hire Jeddit and level his literacy to expert (take Earth Magic, Diplomacy, then Literacy). Simultaneously, visit the stones of knowledge with Dessa (take Pandora's Box with Dessa). In my view, the map creators intended for the map to be completed using so-called "bonus" units located on the map that join your army as you progress. Therefore, my entire tactic was based on this. Minimum moves spent on side activities and just keep moving forward.
Jeddit is a very powerful hero for a fast start; therefore, with his Blindness (obtained at the shrine of magic gestures) and Restoration, we clear out the wizards. This allowed me to break through the passage guard at 28-14-0 on day 12. By this point, Dessa had the following secondary skills: expert Wisdom, advanced Logistics, advanced Earth Magic, basic Diplomacy, and advanced Intelligence (I took Navigation last and simultaneously defeated the cavalrymen, freeing the Rider's Gloves). Jeddit has expert Wisdom and Earth Magic.
Next, with minimal one-move expenditures, "level" Jeddit to expert Literacy and teach Restoration to Dessa. Simultaneously, give same intelligence to Dessa (granted for experience). Attention! Add ghost dragons to your army—those guarding the dragon bone greaves along with other "undead"—and the knights of darkness guarding the nest on the cliff (don't forget to pick up the greaves).
Next, sail to another land with the goal of capturing Fort Tormin, as time is precious.
I decided to free AlexeyPank from prison simultaneously, especially since Dessa reached her destination in two days whether she had the Sea Captain's Hat or not. So, have Dessa learn Navigation and free the Rider's Gloves. Defeat the phoenixes and get into a boat (by this point Dessa should have learned Pathfinding). For me, this happened on day 15, and the army consisted of 3 ghost dragons, 7 death knights, 14 vampires, 26 orcs, and 72 goblins. Then, in two days, reach point 99-75-1 using whirlpools 55-41-0 and 97-65-1.
Break the passage guard (48-12-0) with Celt.
Attention!!! Buy out two heroes in Castle Slau, have them learn Navigation at the witch's hut and visit the stones of knowledge. These heroes will be helpers toward the end. Use one to sail to the passage guard (61-1-1), the other to point 58-100-1, and let them wait for their time.
On day 18, take the town of Tormin, "breaking" archangels and chaos hydras along the way; exchange dragons and knights for gold (the surprise from VDV_forever (100-100-0) is bypassed for now using advanced Pathfinding). We already have a capitol, so there's no need to build one in our starting castle.
Hire an army (see below) and break the garrison. From here on, I will not focus on the battles themselves, leaving room for you to act. I will only help by reporting the army before and after the battle. So, before the fight with the garrison: 6 ancient behemoths, 14 cyclops kings, 3 roc birds, 27 orc chieftains; I fought this without losses. Using the experience gained from the battle, have Dessa learn Air Magic. Next, take Kildar, remembering to break the griffin conservatory on the way (the gargoyles guarding the magic armor nearby are not joined yet—not enough "meat").
Wait until day 22, buy out ancient behemoths and cyclops in Tormin, and join 1996 gargoyles (my army before joining gargoyles: 2 angels, 11 behemoths, 23 cyclops, 19 roc birds, 27 orc chieftains).
On day 23, I broke the surprise from VDV_forever (attacked with only gargoyles), and 1187 remained. Now Dessa knows the Town Portal spell. Teach Town Portal to Jeddit, give him all the army, give artifacts to Celt, and have the latter kill the ancient behemoths (2-3-0). This allows you to level up Celt as well. Have him learn everything Jeddit knows from Jeddit.
From here, it's ridiculously simple. Use Dessa to kill nag kings (63-90-0) and pick up the boots of speed. Run full tilt toward Castle Auer, remembering to kill pegasi (93-77-1) and cyclops kings (74-99-1), picking up the titan's gladius and the helmet of celestial thunder. Take Auer, build artifact traders. Simultaneously, use Jeddit or Celt to free AlexeyPank from prison with the Sea Captain's Hat and, after killing demons, pick up the frozen dragon eye. Pass both artifacts to Dessa.
Don't forget to break the passage guard (47-48-0) with Celt.
Sail with Dessa to Castle Valtara and take it on day 27.
Collect the remaining armor and shield for the titan's roar.
Day 29 arrives. Therefore, in the dark of night between days 28 and 29, "arrange" a sea conduction necklace from the artifact traders in Castle Auer and assemble an admiral's hat for Dessa.
Kill efreets (4-86-1) and exchange the roar for 100 archangels at the seer's hut (if you wish, this can be done with hypnosis—scholar (78-76-0)). Before the battle: 6 archangels, 17 ancient behemoths, 37 cyclops kings, 887 gargoyles. I lost only gargoyles; 334 remained. This was on day 31.
Use Dessa to break the passage guard at 72-78-0 (the required level 30 is already reached) and have Celt, taking behemoths, roc birds, and cyclops, run and break the passage guard (38-57-0), joining phoenixes (50-57-0) on the way. Then use him to free Joker from prison, taking red dragon flame tongues and the army.
On day 32, Dessa with 106 archangels and 334 gargoyles kills Xaker (lost only gargoyles), taking the dragon tooth crown. Then first sail, then run to point 88-18-0, where you join powerful liches (88-18-0). Note: While breaking the garrison at 71-20-0, I lost 7 archangels. The path from the liches to the dragon tooth necklace 106-5-0 was traveled by AlexeyPank with 2 archangels to save time. With AlexeyPank, I activated the event at 102-7-0 and escaped, buying himself out in Slau. Pass the necklace to Dessa (by any means known to you).
Simultaneously, set up hero chains. The first chain from Slau to the seer's hut 49-23-0; Celt with Town Portal should be last. The second chain from Auer to point 59-99-1; Jeddit with Town Portal should be last.
Next, Dessa takes 10 rusty dragons from Celt and, with an army of 97 archangels and 17 behemoths, breaks the black dragons, preferably without losing anyone. I think you have already visited the keymaster's tent (16-27-0) (start of day 35).
Next, use a helper hero (see above) to break the passage guard, take the dragon scale armor, and pass it to Dessa.
Dessa, after replenishing mana, passing the Sea Captain's Hat to Celt via the hero chain, and taking 97 archangels, 17 behemoths, 37 cyclops, 10 monarch wyverns, 14 phoenixes, and 409 liches, runs to Magnus and breaks him, taking the dragon scale shield (day 36). After the battle, I had 97 archangels, 17 behemoths, 37 cyclops, and 239 liches. The main thing is to break your own catapult "by other hands" (read: phoenixes) and prop up the castle door (from the outside) with your own unit (phoenix). That's a clean victory.
Meanwhile, Celt should exchange the Sea Captain's Hat for a diplomat's ring at the seer's hut 49-23-0, break the passage guard at 57-5-0, free Night from prison and take the motionless dragon eye, passing it along with the red dragon flame tongues to Dessa.
Using the second hero chain, pass all army and artifacts (especially the cursed armor) from Dessa to Jeddit. From Jeddit, pass everything to the second helper. In one day, he kills monarch wyverns, breaks the passage guard, picks up the dragon wing cloak, and passes everything back to Jeddit.
Attention!! If your helper ran out of moves, make sure in time to pass the sea conduction necklace from Dessa (after she defeats the black dragons) to the second helper.
Jeddit passes everything to Dessa and Dessa collects the power of the father of dragons.
It took me 36 days in total.
Thank you for your attention, good luck and fighting spirit to you!

Daily saves:
Day 1:
Day 2:
Day 3:
Day 4:
Day 5:
Day 6:
Day 7:
Day 8:
Day 9:
Day 10:
Day 11:
Day 12:
Day 13:
Day 14:
Day 15:
Day 16:
Day 17:
Day 18:
Day 19:
Day 20:
Day 21:
Day 22:
Day 23:
Day 24:
Day 25:
Day 26:
Day 27:
Day 28:
Day 29:
Day 30:
Day 31:
Day 32:
Day 33:
Day 34:
Day 35:
Day 36:
User Avatar
19 years ago
Auto-translated
Sage


Walkthrough Description.


First of all, I'll say a few words about my out-of-game mistakes.
I should have studied the map more carefully in the editor and conducted further reconnaissance. For example, I missed the quest for 100 Archangels and didn't fight for the Surprise because I didn't know that a Town Portal was given there. If I had known about these things, I would have used a different walkthrough strategy.

Day 1:
Kelt begins exploring the territory, visits the stables and goblin barracks, and collects gold while heading toward the sawmill. We build the prefecture in the town.
Day 2:
Kelt takes more gold (I only take gold from chests) and runs to the sawmill. A hero – Dessa – is purchased in the town; she visits the stables and hands over her army to Kelt, who attacks the troglodytes and recruits them, after which he sets a course for the ore mine. Dessa captures the sawmill and goes to collect resources and gold. We build the market.
Day 3:
Kelt visits the mill, collects a resource tax from the miller, and captures the ore mine by killing gnoll marauders. We build the mages' guild.
Day 4:
Kelt visits the goblin barracks and runs to the chest to the right of the town. We build the smithy.
Day 5:
Kelt takes the chest and heads to the town. We build the municipality.
Day 6:
Kelt buys a magic book in the town, takes Pandora's box, and runs left from the town, where he visits the stone of knowledge and takes a chest. We build the wolf pen.
Day 7:
Kelt ends up at the gladiator arena and, after defeating basilisks there, receives +2 to defense. Then he kills mummies and captures the crystal mine, gets tired, and stops at the upper goblin barracks. We build the cliff dwelling.
Day 8:
Kelt goes through the town, where he buys roc birds, and via the stables heads toward the lower goblin barracks. We build the stronghold.
Day 9:
Kelt kills dwarves at the school of magic and visits it. Dessa settles for the night under the lower stone of knowledge.
Day 10:
Kelt takes a pile of sulfur near the archangels, visits the pond, recruits dragonflies by same ogre's club and takes the club. Then Kelt breaks through the ogres and loots the dwarves' treasury, staying the night there along with 1 wolf rider. Dessa takes the entire army from Kelt and heads toward the golems on the right. We build the Castle.
Day 11:
Dessa successfully deals with the golems and picks up the high druid's crown, passing it and the army to Kelt on the same turn. Meanwhile, Kelt visits two stones of knowledge, and after taking the army and artifact from Dessa, heads toward the gemstone pond.
Day 12:
Kelt clears the gemstone pond and the alchemist's laboratory, which Dessa captures. Kelt runs up the road.
Day 13:
Kelt defeats zombies, visits the magic stream, and runs to the town. Dessa visits the stone of knowledge under the mill and heads down the road.
Day 14:
Here Kelt had to run down to learn blindness (forgot to learn it earlier), while Dessa, passing from below, took all his troops for the night except for the dragonflies. We build the monster cliff.
Day 15:
Kelt goes through the stable to the town, where he hires 3 monsters and 1 roc bird into the army, then manages to reach the lower goblin barracks. Dessa, having visited the water mill, heads toward the town.
Day 16:
Kelt, after killing pompous champions and taking the rider's gloves, as well as entering the witch's hut, heads to the shipyard. Dessa runs to the town.
Day 17:
Dessa enters the town via the stables, hires an army with all her money (leaving 1000 for buying a boat), and hands it over to Kelt. Kelt attacks phoenixes sunbathing on the beach and wins. After that, he boards the ship.

Kelt has

level 8, 12/5/4/6 0/1, 109 mana.

Skills: expert attack, expert earth magic, expert logistics, expert diplomacy, basic navigation.

Troops: monsters 3, roc birds 12, dragonflies 9.

Day 18-21:
Kelt sails to the upper town of the orange player and lands near archdevils, who completely ignore any arguments about allowing the glorious hero Kelt free passage to the island and must be killed.
Army after battle: monsters 3, roc birds 5, dragonflies 3.
Meanwhile, Dessa visits all the upgrades near the starting town.
On the orange player's turn, his hero must go to his own town, not deeper into the island.
Day 22:
The task for this day was to capture the town while preserving all monsters. The guard in the town with a built castle consisted of 27 archers, 30 spearmen, and 39 halberdiers without a hero. All attempts to achieve this with the existing army failed, and I decided to hire at least 9 archers in the dwelling on the left; however, the dwarves guarding the dwelling, after carefully listening to Kelt's arguments, decided to join his valiant army. Having hired another 9 archers and taking a scholar with him, Kelt attacked the town, splitting dragonflies by 1 into three slots. Blindness and magic missile spells are used in battle, and then the dwarves cross the moat and the breach in the wall, destroying enemy stacks. And so the town was taken. An upgraded marksmen tower was built in it. On the orange player's turn, his hero named UTER tried to retake the town, but the siege was held.
The main thing here was for the enemy hero to attack, so Kelt's army consisted of: 3 monsters, 13 dwarves, 9 halberdiers, 18 marksmen. The only danger from the enemy were 61 mummies and 25 nomads. But the task of preserving the monsters was completed; 16 marksmen and 5 dwarves also survived.
Day 23:
An upgraded griffon tower is built in the Castle. Kelt headed to hire 1 angel at the portal of glory on the left. Dessa runs away from horned demons near the starting town and is bought out in the Castle.
Day 24:
On this turn, Kelt gives his entire army to Dessa, who hires an army from the Castle with all available money and boards a ship. Kelt will now play a secondary role.
Day 25:
Dessa lands to the right of the gold dragons, while Kelt sets out to capture mines near the captured Castle.
Day 26:
Dessa moves down, capturing the alchemist's laboratory on the way and stops for the night at a well. Kelt, having hired the remnants of the army in the castle, goes deeper into the island.
Day 27:
On this day, the main thing is not to cross paths with Serg, so Dessa sends scouts ahead, whose reports helped avoid this encounter. Dessa spends the night 7 cells below the well.
Day 28-29:
Seeing that Serg ran right across the map, Dessa heads straight for the orange player's second town and takes it easily the next day. And Kelt captures the second portal of glory on the island.
Day 30-31:
Dessa captures a gold mine and a crystal mine above the town, as well as the monks' dwelling, where she recruits them. Additionally, she loots the Naga bank. On day 30, we build an upgraded portal of glory in the second castle, and on day 31, upgraded barracks there. Dessa stays in the castle for the night and is attacked by the orange player's hero, Serg.

Note: the starting position of units on the battle map corresponds to the troop lists provided below for the hero (except for war machines).

Battle with Serg:

Hero Serg has:
Attack-----9
Defense---7
S.M.-------3
Knowledge---2
Mana-----20
Luck----3
morale--3

Troops:
Fanatics-------------------------9
Ogre Magi------------------11
Monks---------------------------3
Knight---------------------------18
Orc Chieftains---------------------17
Royal Griffins(RG)---72
Angels---------------------------12
Ballista--------------------1
Catapult-----------------1

Hero Dessa level 7 has:
Attack-----9
Defense---4
S.M.-------4
Knowledge---7
Mana-----61
Luck----0
morale--1

Troops:
Fanatics--------------------10
Archangels(A)---------------4
Cavalry-----------------5
Monsters-----------------------3
Crusaders----------------17
Royal Griffins-----4
Royal Griffins-----1
Defending in the castle.

Turn 1: First of all, we blind the enemy RG and wait for A. The enemy angels take the bait of 4 RG and kill them; we hit the angels with 1 RG, and then with all other troops.

Turn 2: We blind the angels and begin destroying the non-blinded enemy units.

Following turns: When the blindness on RG wears off, we blind them again. On the next turn, the blindness on the angels wears off and they hit the cavalry and kill them. With Crusaders (1 of whom survives), we take the retaliation from the angels and hit them with all other units. On the next turn, we wait for A; the angels hit the fanatics and kill them. With 1 crusader, we take the retaliation from the angels and hit them with all other units (angels are finished). The enemy only has RG left, while Dessa has 4 A and 3 monsters. Entering the walls, RG attack the monsters, then monsters attack RG, die and are resurrected using the ability of A. On the next turn, we wait for A; RG attack the monsters, then monsters attack RG and die. We cast shield on A and attack RG with them. On the next turn, we cast heal on A and attack RG again. RG attack A and die from the counterattack.

Result: The siege was held, 4 archangels are alive, which is what I needed.

Day 32:
Dessa, with an army of 4 archangels, runs for the gemstone ring, killing the silver pegasi guarding it.
Day 32-35:
Dessa visits all nearby upgrades and captures the nearest mines. At the end of day 35, Dessa enters the Castle. A portal of glory is built in the Castle on the island.
Day 36:
Having bought another 4 archangels, Dessa heads to the coast.
Day 37:
Dessa opens a "can" guarded from outside by completely wild manticoras and inside by 150 griffins, and frees 3 angels, who express a desire to travel with Dessa.
Day 38:
Dessa kills liches, loots the medusa treasury and vampire lords on the right, taking the sign of courage from them. Then Dessa captures the gold mine on the left. Kelt hires an angel at the far portal of glory on the island and runs to the near portal of glory. An upgraded portal of glory is built in the Castle on the island.
Day 39:
Dessa kills the gold dragons guarding the shipyard and builds a ship, which Dessa boards (the ship Dessa arrived on was stolen by the last hero of the orange player). Kelt hires an angel at the near portal of glory on the island and runs to the crystal mine.
Day 40:
Dessa sails to the coast of the island, while Kelt falls slightly short of the Castle on the island.
Day 41:
Kelt buys all archangels (there are 5) and 2 royal griffins in the Castle and upgrades 4 of his angels hired in external dwellings. At the same time, he exchanges almost all resources for gold and gemstones. Then he gives this entire army to Dessa, taking 3 angels from her. At her own risk, Dessa dives into a whirlpool and emerges in the right underground whirlpool, after which she lands on the snowy land near the shipyard.
Day 42:
At night, the blue player's heroine named Ta settles camp at the shipyard, and in the morning, after defeat by Dessa, sets out to find a new employer. Dessa loses 1 royal griffin in this battle. Next, noticing the Titan's Gladius artifact guarded by pegasi, Dessa decides to claim it, which she does without troop losses (here it was necessary to divide archangels into 2 stacks of 6 and 11 and use slow magic (expert) and blindness, as well as shield). After these valiant victories, Dessa, having visited the arena and captured the crystal mine, heads toward the Tower town.
Day 43:
The capture of the Tower occurs without losses, and she stops there to rest and replenish mana points.
On this day, Dessa reaches level 19 with parameters 20/11/7/11 and expert skills: wisdom, logistics, earth magic, navigation, attack, intelligence, air magic.
Kelt, in turn, boards a ship and sails to the starting town.
Day 44:
Having rested and surveyed the surroundings from the watchtower, Dessa notices the sentinel's shield guarded by horned demons and decides to get it for herself, building a level 4 mages' guild before leaving the Tower and learning the useful restoration spell there. And the horned demons... well, they offered no particular resistance to Dessa, who became level 21 after the battle, acquiring pathfinding at an advanced level and thus solving the problem of slow movement on snow. Dessa's overnight stay (after capturing the cloud temple) was arranged one turn down from the gemstone pond.
Day 45:
In the morning, scouts brought news that to the north is the Titan's Armor artifact guarded by stubborn wizards. Therefore, a hero hired in the Tower bought 5 master djinns and 1 obsidian gargoyle and handed them over to Dessa, who wasted no time in taking the desired artifact from the conceited wizards. (The battle is fought as follows: we stand in defense with archangels and blind 1 stack of wizards; master djinns are divided into 5 stacks of 1. The first two djinns must cast air shield on the archangels and not cast rage. We move forward with the other djinns and obsidian gargoyle. On the next turn, we stand in defense with archangels and blind 1 stack of wizards; djinns move forward, and those who reach non-blinded wizards stay near them. On the next turn, we stand in defense with archangels and blind 1 stack of wizards, and the remaining djinns stay near the wizards. On the next turn, with archangels, we resurrect 1 djinn near non-blinded wizards and blind 1 stack of wizards. On the next turn, we stand in defense with archangels and blind 1 stack of wizards. On the next turn, we blind 1 stack of wizards and attack the remaining non-blinded wizard stack with archangels. On the next turn, we cast shield and begin exterminating wizards stack by stack, casting restoration on archangels every turn. After the battle, all archangels survive. Oh, poor master djinns). Additionally, toward evening, Dessa reaches the Tower town, where she spends the night.
Day 46:
Dessa also learns about the helmet of celestial thunder guarded by cyclopes, so hiring 1 remaining master djinn and 5 obsidian gargoyles, she heads to meet these one-eyed shooters. She reached them smoothly (even captured a gold mine on the way), but they didn't welcome her warmly; nevertheless, the same had to give up the helmet to the cyclopes (battle tactics are similar to the previous one, only 1 djinn and 5 stacks of 1 gargoyle. After the battle, all archangels survive. Oh, poor gargoyles and poor master djinn). After the battle, Dessa has just enough strength to pick up the helmet and immediately lie down to rest.
Day 47:
Collecting resources lying nearby in the morning, Dessa went to the Tower town, where she spent the night.
Day 48:
On this day, a battle took place between Dessa and phoenixes north of the Tower town on the coast. After that, Dessa boarded a ship she summoned.
Day 49:
Crossing a narrow strait, Dessa at her own risk lands in the territory of the Dungeon lords.
Day 50-52:
During these days, a Dungeon town on the center right was captured, and a hero of the tea player named Fanat, who tried to escape pursuit by ship, was defeated. After the battle, Dessa boarded the ship herself, sparing the tea player's hero named Tigryonok and the upper Dungeon town.
Day 53-54:
Dessa sails across the sea to the left Dungeon town and lands at the shipyard to its right.
Day 55:
On this day, Dessa decided not to attack the Dungeon town, but having captured a gold mine near it, stopped to spend the night there. However, toward evening, the tea player's hero named Supreme decided to test his strength against her but quickly realized that this was a very rash act. On the same day, Kelt set out from the starting town with ten ancient monsters in search of artifacts in the land of undeath and on the swamp.
Day 56-57:
Having finally captured the Dungeon town, Dessa returned to the shipyard, and on the 57th day, she boarded a ship.
Day 58:
Sailing back to the place of the recent battle with phoenixes, Dessa took 10 titans and 4 obsidian gargoyles from Gundula, who was waiting for her, as well as an ammunition wagon, giving in return 15 archangels and sailed to a rendezvous with black dragons.
Day 59:
The black dragons looked at the titans with evil eyes, but could do nothing, and Dessa celebrated victory, losing 4 obsidian gargoyles. After that, she sailed for the deserved artifact: dragon scale armor (The battle with black dragons went like this. 10 titans were positioned on top, above the ammunition wagon; below it was 1 archangel, then 1 obsidian gargoyle, then 1 archangel, and three stacks of 1 obsidian gargoyle at the bottom. Black dragons were arranged in 5 stacks of 89 each, and the top stack had 90. My turn was naturally first, and with the top archangel I flew slightly down and forward, then cast a force field on 3 cells in front of the titans and ammunition wagon, so that only a creature size of 1 cell could reach the ammunition wagon. With the second archangel, I flew forward and down. Black dragons attacked and killed archangels and obsidian gargoyles, coming under direct fire from the titans. On the next turn, I cast an expert haste spell, and the titans began to move before the black dragons. After that, every second turn I cast a force shield spell, placing it as in the first turn; additionally, I cast haste, blessing, and accuracy on the titans as needed. As a result, the titans shot down the black dragons with impunity, leaving 2-4 in stacks. Once there were 4 stacks of 2-4 black dragons each, two archangels were revived by the restoration spell. After that, the black dragons were finished).
Day 60:
Taking her due dragon scale armor, Dessa sailed back to Gundula. Meanwhile, a hero with 12 archangels left the second Castle. And Kelt finally freed a hero named AlekseyPunk from imprisonment, took his admiral's hat and set off for the swamps. AlekseyPunk headed to the shipyard.
Day 61:
Meeting Gundula and taking back 17 archangels and another obsidian gargoyle, Dessa went to the nearest whirlpool, which was above.
Day 62:
Emerging from the whirlpool under the Castle on the island, Dessa stopped her ship for the night awaiting reinforcements. And AlekseyPunk boarded a ship on the evening of the same day.
Day 63:
Dessa received 33 archangels from secondary heroes, collected in two Castles and two external portals of glory during her absence, as well as 1 centaur. Diving into the nearest whirlpool, she emerged from the lower underground whirlpool and headed to visit wyvern monarchs. The next day, a secondary hero followed her with 10 titans, 14 centaurs, and 5 archangels hired that day. AlekseyPunk landed on the necromancer's island.
Day 64:
Dessa fought wyvern monarchs and defeated them without losses (the tactics of this battle are simple. Archangels are divided into two stacks of 25 each; on the first turn, mass slow is cast, then blindness, and then wyvern monarch stacks are killed one by one. Restoration is cast on archangels, and they cast it themselves. The battle was complicated by a small amount of mana: 215; after the battle, 12 remained). On the same day, Kelt frees a hero named Bron from imprisonment, takes the frozen dragon eye artifact from him, and goes to the lands of undeath.
Day 65:
Taking another 5 archangels, 10 titans, and centaurs from a secondary hero, Dessa dives into a whirlpool and emerges in the upper above-ground whirlpool, then manages to land at the anti-magic garrison. Kelt recruits 6 spectral dragons, then 18 death knights, takes the dragon bone kneepads artifact, and goes to the shipyard. Additionally, two heroes necessary for taking the frozen dragon eye artifact are hired in the starting town, so as not to distract Kelt.
Day 66:
Breaking through the anti-magic garrison, losing 4 titans and all centaurs (there were only 11), Dessa kills vampires, visits first the library of enlightenment and then the well, kills crystal golems, visits the school of war, and still manages to get back on the ship. The two heroes hired last turn obtain the frozen dragon eye artifact using an army taken from Kelt, who runs toward the shipyard along the way.
Day 67:
Dessa lands on the necromancer's island. Kelt takes the frozen dragon eye artifact and his army from a secondary hero and boards a ship.
Day 68:
Having visited the school of war, Dessa goes to drink tea with the necromancer Hacker. And after victory over him, she boards the ship AlekseyPunk arrived on, while AlekseyPunk boards the ship Dessa arrived on, taking titans from her and giving spectral dragons. Also, a secondary hero with advanced navigation skill boards the ship.

Battle with Hacker:

Hero Hacker has:

Attack-----34
Defense---33
S.M.-------38
Knowledge----35
Mana-----much
Luck----3
morale--0

Troops:

Powerful Liches---124
Skeleton Warriors-------------917
Wraiths-----------------226
Death Knights-------------81
Vampire Lords-----------162
Spectral Dragons--------43
Zombies------------------------100
First Aid Tent-1
Defending in the castle.

Hero Dessa level 31 has:

Attack-----26
Defense---29
S.M.-------26
Knowledge---11
Mana-----435
Luck----3
morale--3

Troops:

Titans--------------6
Archangels---------55
Monsters-------------10
Death Knights----17
Catapult---------1

In principle, this battle presents no particular difficulty.
Turn 1: I cast mass slow and move forward with death knights and ancient monsters. Hacker slows archangels; after waiting, archangels attack vampire lords..
Turn 2: I cast mass shield and fly back with archangels; their morale triggers. Hacker's troops leave the castle and attack my ancient monsters and death knights, while Hacker casts dispel magic on his death knights. I hit powerful liches with archangels.
Turn 3 and onwards: gradually kill enemy stacks, casting restoration on archangels. Hacker uses a raise dead spell, but it doesn't help him much. When Hacker is left only with raised powerful liches, after waiting, we cast restoration on titans with archangels and ordinary restoration on monsters. On the next turn, we kill powerful liches with archangels.

Result: 55 archangels survived (all), 6 titans, 5 ancient monsters.

Day 69:
Dessa sails to land on the continent with the Conflux town; Kelt lands there. AlekseyPunk lands near the anti-magic garrison.
Day 70:
At the coast, an army from the Castle on the island is handed over to Dessa, and she lands on the continent with the Conflux town. Kelt runs to the watchtower in the canyon. AlekseyPunk runs through the anti-magic garrison and further to the watchtower. We begin building a chain of heroes to transfer the dragon wing cloak artifact from the dungeon.
Day 71:
Dessa and Kelt run to the watchtower in the canyon. AlekseyPunk runs further to the watchtower.
Day 72:
First Dessa, then Kelt pass the watchtower in the canyon. AlekseyPunk passes the watchtower on the upper island, takes the dragon tooth necklace artifact and heads back to the ship. A secondary hero with 8 archangels and 50 crusaders leaves the second Castle. The chain of heroes for transferring the dragon wing cloak artifact from the dungeon is complete.
Day 73:
The secondary hero with 8 archangels and 50 crusaders hands them to Kelt, and Kelt to Dessa. Kelt runs to the Conflux town, while Dessa runs to the prison. AlekseyPunk heads for the ship.
Day 74:
Dessa frees a hero named Joker from imprisonment and takes the red dragon flame tongues artifact from him, as well as 10 rust dragons and 49 wyvern monarchs, after which she visits the school of enlightenment on the left and runs to the Conflux town. Kelt runs to the Conflux town. AlekseyPunk boards the ship. The secondary hero runs to the coast.
Day 75:
Kelt opens the path to the Conflux town for Dessa. Dessa attacks the Conflux town and wins the battle, after which she turns around and runs to the coast.

Battle with Magnus:

Hero Magnus has:

Attack-----19
Defense---18
S.M.-------16
Knowledge---7
Mana-----70
Luck----0
morale--0

Troops:

Storm Elementals (SE)------626
Magma Elementals---------1084
Ice Elementals (IE)-----------826
Magic Elementals (ME)------342
Fairies---------------------------------------55
Phoenixes (P)----------------------------192
Energy Elementals (EE)--500

Hero Dessa level 32 has:

Attack-----28
Defense---31
S.M.-------33
Knowledge---17
Mana-----460
Luck----3
morale--3

Troops:

Fanatics---------------------------38
Crusaders----------------------104
Rust Dragons (RD)-----------10
Royal Griffins (RG)----99
Archangels (A)--------------------64
Wyvern Monarchs---------------49
Spectral Dragons (SD)----5
Ballista----------------------------1

Turn 1: Magnus has expert water magic, so he immediately casts prayer on everyone, receiving mass slow in response. We wait with all units except SD and wyverns, which attack phoenixes and successfully first age them, then poison them. Magnus puts everyone except shooters into defense. SD, Wyvern Monarchs, fanatics, and RG die. We hit phoenixes with RD and archangels without retaliation.
Turn 2 : We cast explosion on P. A and RD fly back; others stand in defense. Magnus casts mass heal and shoots at RD.
Turn 3 : Magnus casts slow on RD. I cast mass slow. We wait with all units. Then we attack SE with RD and ME with A.
Turn 4 : Restoration on A, and RD and A fly back. Magnus casts slow on A.
Turn 5 : Restoration on A. We wait for A and RD. Magnus casts ice arrow on RD. We attack with RD and A.
Turn 6 : Restoration on A. RD and A fly back. Magnus casts shield on Fairies. His warriors leave the castle, while P attack RD.
Turn 7 : I cast blindness on Fairies. A attacks ME with a luck fail. Magnus casts mass heal, attacking RD.
Turn 8 : Magnus casts shield on EM. I cast mass slow. A hit SE. All my units die except A.
Turn 9 : Magnus casts shield on IE. I cast mass haste. A flies to the lower left corner. P hit A; other Magnus's units don't reach A.
Turn 10 : Restoration on A and attack SE with them, who perish. Magnus casts magic missile on A and runs out of mana. P hit A. Other Magnus's units don't reach A.
Turn 11 : Restoration on A. A flies to the lower left corner. Magnus casts shield on EE. P hit A. Other Magnus's units don't reach A.
Turn 12 : Restoration on A and attack SE with them, who perish. Magnus casts magic missile on A and runs out of mana. P hit A. Other Magnus's units don't reach A.
Turn 13 : Restoration on A. A flies to the lower left corner. P hit A. Other Magnus's units don't reach A. ME stand before IE.
Turn 14: Restoration on A and attack ME with them. P and IE hit A. Other Magnus's units don't reach A.
Turn 15: Restoration on A. A flies to the lower left corner. P hit A, die from A's counterattack and are resurrected.
Turn 16: Restoration on A and attack ME with them, who perish. P hit A. Other Magnus's units don't reach A.
Turn 17 and onwards: Cast restoration on A and fly away from enemy units, occasionally attacking them. Also use restoration of A on RD when possible.

Result: 64 Archangels survived.

We take the dragon wing cloak artifact with the first hero in the chain of heroes and pass it through the chain to the surface. AlekseyPunk sails to the nearest whirlpool, dives into it and emerges from the whirlpool under the Castle on the island, while passing the dragon tooth necklace artifact to the last hero (he has 1 archangel in his army) in the chain of secondary heroes, who lands on the continent with the Conflux town. The secondary hero from the second Castle spends the night above the witch's hut. Another secondary hero (Geon) leaves the second Castle.
Day 76:
Dessa runs to the coast. The secondary hero runs deeper into the continent and passes the dragon tooth necklace and dragon wing cloak artifacts to the secondary hero from the second Castle, who in turn passes them to Geon. In the end, Geon manages to pass the dragon tooth necklace and dragon wing cloak artifacts to Dessa on this day. Dessa now has all the required artifacts for victory.

Press the end turn button and watch the congratulations on achieving victory.

Afterword.

Well, what else is there to say. There were mistakes in the game. I replayed some battles many times (with Serg; with pegasi against the Titan's Gladius; with wizards; with cyclops; with monarch wyverns due to the hero's small amount of mana in that battle; with the anti-magic garrison; with Hacker, although the battle there is quite simple; with Magnus), refining the tactics for a victory without losing archangels, since archangels were essentially my only striking force, except for the battle with black dragons.

Thank you for your attention.
Sincerely, Sage.
User Avatar
19 years ago
Auto-translated
Description of the 1st stage of the "Ally" BLITZ Tournament!


VDV_forever

Greetings, dear tournament participants![/CENTER]

After reviewing the tournament map, I made the following preliminary decisions, which subsequently turned into mini-tasks:

1. To fit within one game day, it is obvious that all 7 mines must be captured! For this purpose, at least 5-6 heroes will be needed.
2. The result in the final table will be significantly affected by the amount of gold collected. To achieve this task, it is necessary to gather the maximum number of resources using the minimum number of heroes.
3. Exchange all resources for gold at the market.
4. It is necessary to work out an option: taking the water mill and capturing a nearby mine with one hero!
5. All this can only be carried out by logistics heroes (runners).

Ways to solve the above tasks

The starting hero Crellion essentially performs the most important and primary task: capturing the market! The main goals are decided based on his further actions. In essence, it is from him that the walkthrough diverges for all tournament participants. Other heroes perform secondary tasks and act more or less similarly for everyone, namely:

- one mine per hero, and resources where possible.

I will now move directly to the tournament walkthrough itself.
With your permission, I will not describe it in detail, as the respawn is small and everything is clear without specific indicators in the form of points for the location of a particular hero/resource.

However, I have made a map of the RESPAWN; by printing it out, everything will be clear, and reading this description will be easier and more understandable than following points.

Abbreviations used on the RESPAWN map:
K – crystal;
Z – gold;
S – chest;
Sulfur – sulfur;
R – ore;
D – wood;
N – oil (mercury);
A – diamonds (gems);


1. Hero Crellion (Hero №1) takes a step down and immediately increases the treasury by +700 gold (Z2). Then he RESISTS THE TEMPTATION TO CAPTURE 2 MINES and keeps his way to the stables. On the way, Crellion brings +5 wood (D2) into the treasury (which is necessary for building the tavern) and stops at the stables.

The local stableman provides Crellion's army with new horses, and he gains one more move. Having received a surge of strength, brave Crellion turns his horse and gallops to join 20 snipers. After successful negotiations, the snipers willingly join Crellion's ranks.
Since Crellion was a speculator, and moreover obsessed with resources and gold, without even thinking he finds +6 sulfur (Sulfur3) and runs as fast as he can for the distant gold +900 (Z3), which lies unclaimed near the garrison.

With his last strength, lucky Crellion reaches the market, where he stays for the rest of his days.
Such was the difficult path chosen by Speculator-Crellion!
After completing Crellion's moves, the treasury contains the following resources:
13 logs; 8 ore; 6 sulfur; 1600 gold.

I draw your attention to the following points:

- if you visit the stables first and then take the logs, you will not succeed in taking the market as the last step!
- logs must be taken not using the path suggested by the computer, but manually using the keyboard while saving several movement points:


1-1. In the glorious village of DOLER, a tavern is built (-5 logs; -500 gold).
1-2. At the market, we exchange 6 sulfur and 7 ore for gold. We obtain the necessary amount to buy the next hero.

2. We hire the glorious Hero Gird (Hero №2)! Under him is, of course, the runner-logistics Kirr.

Everything here is clear and simple:

Gird, without leaving the village, grabs a nearby chest on the left +1500 gold (S4), then a chest on the right +2000 gold (S5), and finally the sulfur mine.
Without thinking long, he waters his horse at the stables and captures the sawmill on his last move!

After completing Gird's moves, the treasury contains the following resources:
8 logs; 1 ore; 3525 gold.

Before I describe further, I want to share a certain peculiarity that I had not observed before and have read about nowhere, but encountered specifically in this tournament!

IT TURNS OUT THAT THE STARTING SPEED OF A HERO IS OF GREAT IMPORTANCE DEPENDING ON WHICH CASTLE HE WAS BOUGHT FROM (NATIVE, ALLIED, OR HOSTILE)! This can be seen in detail in the example described below.
AmberSoler, if this point is not in the manual (I haven't seen it anyway), please add it.

Excerpt from the physics of the heroes' world:

Terrain penalty does not apply if:
- the hero's army consists entirely of creatures for whom this land is "native" (Native Terrain):

Let's consider 3 of the fastest runner heroes and one pretty girl.

Kirr is a ranger. Native terrain "grass". Starting army 1 centaur = speed in 6 points, which is 1700 mp. Logistics skill +10% + specialization 5% = 1955mp!

Dessa is a battle mage. Native terrain "stones". Starting army 1 goblin = speed in 5 points, which is 1630 mp. Logistics skill +10% + specialization 5% = 1874.5 mp!

Moner is an elementalist. Native terrain "grass". Starting army 1 small fairy = speed in 7 points, which is 1936 mp!

PIR is a demon. Native terrain "lava". Starting army 1 imp = speed in 5 points, which is 1630. Logistics skill +10% = 1793 mp!

It follows that Kirr should run the furthest! And DESSA and PIR THE LEAST!

Let's analyze the speed of these three heroes (PIR will be discussed in point 6) using this tournament as an example.
For this, I will open the map using nwcwhatisthematrix and take a screenshot to show you this path!

I also ask you to note that Moner and Kirr have an advantage over Dessa; they HAVE NO PENALTY on NATIVE TERRAIN – GRASS. And on grass, judging by the Physics of the world data, heroes should not have a penalty at all! And they will all run exactly on grass and roads!

So we launch the runners:

Kirr starts – following the suggested route, he makes the last step to the mercury mine (move 5)!
Dessa starts - following the suggested route, she makes the last step to a chest (move 6)!
Moner starts - following the suggested route, there is 1 small last little step left after 6 moves!

A PARADOX arises, don't you think?
Transferring the unfortunate goblin led to nothing.

From all this, I can make only 1 conclusion:
THE STARTING SPEED OF A HERO WILL BE HIGHER DEPENDING ON WHICH CASTLE HE WAS BOUGHT FROM—NATIVE OR NOT!


3. We hire the glorious hero Kirrr (Hero №3)! Under him is, of course, the runner Dessa.

Kirr, not deviating from the tradition of his predecessors, visits the stables.
Then he heads toward the blue hero, specifically to the distant ore mine (stone mine). On the way, we pick up +6 mercury (N2). Before taking the mine, we take +3 sulfur (sulfur 1), and there is just enough left to place his red flag on the ore mine right before the eyes of a confused Tant.

After completing Kirr's moves, the treasury contains the following resources:
8 logs; 1 ore; 6 mercury; 3 sulfur; 1025 gold.

I draw your attention to the following point:

- Mercury must be taken at a right angle!
- Be sure to take sulfur first, and then the mine, but not vice versa:


3-1. At the market, we exchange 8 logs and 6 mercury for gold. We obtain the necessary amount to buy the next hero.

4. We hire the Girl-hero Dessa (Hero №4)! Under her is, of course, the runner-logistics Gunnar.

Dessa runs exactly as shown on the map and in these 6 moves adds the following resources to the treasury (P2, P1, S3, S1):
18 ore, 4000 gold.

After completing Dessa's moves, the treasury contains the following resources:
19 ore; 3 sulfur; 4025 gold.

5. We hire hero Gunnar (Hero №5)! Under him is again a girl, this time a Demon, with the beautiful name PIR!

His movements are simply primitive:
Stables, crystal mine, and while at the mine's location he takes 900 gold (Z1), 5 crystals (K).

I draw your attention to the following point:

- If you take the crystals first, you will be left without gold because the moves will end! You can also take the gold first, then the crystals, and finally the mine; the result will be the same.


After completing Gunnar's moves, the treasury contains the following resources:
19 ore; 3 sulfur; 5 crystals; 2425 gold.

5-1. At the market, we exchange 1 ore for gold. We obtain the necessary amount to buy the next hero.

6. We hire super-hero PIR (Hero №6)! Under him is a modest guy with a name well-known in the hero world, Gretchen!
Why I called PIR a SUPER-HERO you will understand by looking at the new map of the hero's route!

PIR – MANAGES TO TAKE ALL THIS! AND THIS IS ANOTHER PARADOX, SINCE NEITHER KIRR NOR GUNNAR CAN DO THIS BECAUSE THEY ARE SHORT BY EXACTLY 1 STEP!

Dessa can repeat this (checked), or Moner, or some other super hero (not checked)!

+ on top of everything, PIR has a ballista!

From this, I will make the fantastic assumption that DEMONS AND BARBARIANS are in a commonwealth!

After completing PIR's moves (A, N1, D1, S2), the treasury contains the following resources:
9 logs; 6 mercury; 18 ore; 3 sulfur; 5 crystals; 4 gems; 1000 gold.

6-1. At the market, we exchange 10 ore, 1 sulfur, and 4 gems for gold. We obtain the necessary amount to buy the next hero.

7. We hire Gretchen (Hero №7)! Under him is the well-known Sir Müllich; I didn't even dig him up! No, why couldn't he have appeared earlier.

Gretchen has only trifles left:
+5 mercury (N3) near the gem mine, and the mine itself actually.

After completing Gretchen's moves, the treasury contains the following resources:
9 logs; 11 mercury; 8 ore; 2 sulfur; 5 crystals; 0 gems; 0 gold.

7-1. At the market, we exchange all resources for gold. We obtain a final amount of 3975 gold.

8. Working out an option with Moner was not possible due to lack of time.
However, after the tournament ended, Dmitry A_S provided such a save with a dug-up Moner. Checking showed that Moner is unable to perform point 4 of the mini-task mentioned above.
But if someone solves the riddle of how exactly the appearance of a native, allied, or non-native hero in a particular castle affects their initial speed, then perhaps the task will be solved by another method. For example: put a castle with phoenixes instead of a castle with hippos, dig up Moner and try to follow the path indicated above.

P.S. I ran the heroes again; this time the route was exclusively running and only on the road! The route is as follows: stables, ally's castle.
Results:

Kirr – short by 2 cells!
Dessa – successful. Moves are exactly enough to enter the castle.
Gunnar – short by 1 cell!
PIR– successful. Moves are exactly enough to enter the castle.
Gretchen – short by 1 cell!
Moner – after visiting the castle, exactly 1 cell remains!
Sir Müllich, Fafner – short by 3 cells!


If anyone has time, you can experiment.

Thank you for your attention, that's all. Game Over

Sincerely VDV_forever
User Avatar
19 years ago
Auto-translated
Description of the 2nd stage of the BLITZ Tournament "Desert Storm"!


Radik


Description of the walkthrough for the second blitz tournament

The walkthrough of the tournament map can be conditionally divided into two stages. The main task in the first stage is to get Sylvia to the prison at any cost; otherwise, it will not be possible to complete this tournament in one day and demonstrate “top-notch skill.” In the second stage, Orrin must defeat the dwarves and a hundred spearmen without losing anyone. Essentially, the first part requires knowledge of basic logistics, while the second requires combat skills.
So:
1. With Sylvia, visit the body of water, thereby increasing her movement points by 400 MP.
2. Move left along the body of water and attack 20 compliant spearmen, but refuse to recruit them and kill them without losses (although losses here are not critical; the main thing is to save the dragonfly).
3. Visit the body of water again, moving right. Movement points increase again because a battle took place; that's why you had to kill the compliant spearmen.
4. Attack 20 bloodthirsty spearmen and kill them without losses.
5. Enter the nomad tent, diagonally collect 200 gold coins, and buy 1 nomad. A nomad is simply necessary so as not to receive the desert penalty on the way to the prison, since having even one nomad in your army allows you to move through the desert without terrain penalties.
6. Visit the body of water again to replenish movement points.
7. An important point: dismiss the existing spearmen. This needs to be done to avoid receiving a penalty when crossing swampy terrain, since the hero does not receive a penalty on the swamp if his army consists of units native to the swamp (the nomad doesn’t count, as it is a so-called neutral unit that does not belong to any of the castles). Be sure to position the dragonfly to the right of the nomad; otherwise, the swamp terrain penalty will apply.
Screenshots for clarity:
1) Sylvia with spearmen (she lacks 423 MP).

2) Dismiss the spearmen, and Sylvia reaches the prison perfectly!

8. Run to the prison and free Orrin.
9. With Orrin, make one move down, then take all the artifacts from Sylvia, as well as the dragonfly and the nomad, leaving her only one griffin – during an exchange in the guild of free workers, the dragonfly costs 28 gold more than the griffin, and the nomad costs the same.
10. Enter the oasis with Orrin, thereby replenishing movement points by 800 MP, and run to attack the dwarves, encountering an event along the way that takes away 31 mana out of the 50 that Orrin has.
11. Orrin's army is terrible for melee combat against 35 dwarves, so all hope lies in magic; fortunately, Orrin has a book of fire magic and an expert secondary skill in fire magic. Using the spell "wall of fire," Orrin simply burned the poor but bloodthirsty dwarves while they were trying to reach the dragonfly and the nomad. The battle itself: cast wall of fire and approach closer with the nomad and dragonfly, luring the dwarves towards them

Then just stand there, remembering to cast wall of fire on the same spot at the beginning of round 3, and wait for the stupid dwarves to burn themselves. Result: the dwarves burned without even having time to wave their hammers; losses – 12 mana.
12. Then diagonally collect 5000 gold and go back into the oasis to replenish movement points.
13. Run up to collect sulfur and gold. Collect it as follows: approach the pile of sulfur, stand to its left, and take it directly, not diagonally. Do the same with the other pile of sulfur and 25000 gold.
14. Open the guardian of questions and pick up the amulet of divine grace without any problems by killing two spearmen guarding this vital artifact (which you must remember to put on before the battle with 100 spearmen).
15. Dive Orrin into the monolith entrance and emerge near the oasis, which you should definitely visit.
16. Make one move to the left, attacking 40 compliant spearmen, whom you successfully recruit.
17. Attack a hundred bloodthirsty spearmen, whom you kill without losses again by burning them with the wall of fire (it is very important not to lose a single unit; otherwise, “top-notch skill” will be out of the question).
18. The battle itself: The most important thing is to make all seven groups of spearmen pass through the wall of fire (cast at the beginning of the round). To do this, you need to correctly position your troops on the battlefield because the behavior of the AI depends on the placement of your units. With the arrangement you see in the screenshot, all seven groups of spearmen pass through the wall and burn almost completely. In the first round, four groups pass – the halberdiers burn completely, and three groups are left with one spearmen each.

At the beginning of the second round, hit the spearmen standing opposite the nomad with the dragonfly. Also attack him with the nomad, and kill the top spearmen from the remaining three with the spearmen.
Then the computer moves; the result of its move is shown in the screenshot.

And then just beat them up.
Result: no losses, 1 mana point remains, but that's not important anymore since there is nothing else to fight.
19. Visit the oasis again and start collecting gold. After picking up all eight piles, dive into the monolith entrance and emerge near the guild of free workers and sell all your units. As a result, you get 51946 gold. This is exactly how much is needed to go through the guardian of questions (that’s why I mentioned throughout the story that it was important not to lose anyone in battles).
20. Visit the body of water, open the guardian, and attack the compliant golden dragon, which you successfully recruit, receiving back 51946 gold and Armageddon's Blade. Run back to the guild and exchange the golden dragon for gold, so you have 54746 in your treasury. Orrin still has movement points left for three cells on the road.

That's it, Game over! Read FizMig, and everything will work out for you.
User Avatar
19 years ago
Auto-translated
Description of the 3rd stage of the "Galthran" BLITZ Tournament!


Dmitry_A_S


Walkthrough of the "Galtran" map as part of the Blitz-3 tournament by Dmitry_A_S.

Hello, dear Ekaterina Matv…

Oops, hello dear Heromanes!

Kyle was 1000 times right when he mentioned the ring, even though I told him, told him – don't tell others about it, there will be a riot. Well, whatever – let him deal with it now. Now let's get to the point…

The primary objective on the map is to gather the maximum number of skeletons. The highest amount is achieved by following the golden Avicennian mean:
- destroy the "planted" undead on the map with minimum losses (considering 10 skeletons at start) and higher reproduction after battle;
- take castles with black magic amplifiers with minimum losses;
- the first two points are performed with an eye on quests, considering their time limit.
So, on the first day, among other things, we need to open the passage guard 27-13 (mage's ring). To get the mage's ring, you must kill 10 dragons at 17-16. Additionally, it is necessary to learn fire magic from the scholar at 23-15, so that later Pandora's box at 14-19 can be opened without losses (using Berserk). This task is only solvable if Galthran moves toward Hunt Wind city and visits the stable. Actually, that's what we'll do on the first day.

Day one (terrible).

Galthran.
1. Skeletons 5-5. Mana 12. Cloak disassembled. Point 20-9, kills 20 skeletons without troop or mana losses (hereafter I will mention losses in my army and use of mana only when they occur). + 6 skeletons.
2. Skeletons 8-8. Cloak disassembled. Kills 10 skeletons. + 3 skeletons.
3. Skeletons 10-9. Cloak disassembled. Point 19-9. Kills 30 skeletons. +9 skeletons.
4. Skeletons 27-1. Cloak disassembled. Point 21-10. Kills 20 zombies. +5 skeletons.
5. Skeletons 32-1. Cloak disassembled. Point 20-10. Kills 30 zombies. + 12 skeletons.
6. Skeletons 44-1. Cloak disassembled. Point 19-10. Kills 40 zombies. + 18 skeletons.
7. Skeletons 61-1. Cloak disassembled. Point 16-9. Kills 20 skeletons. + 10 skeletons.
8. Skeletons 72-1. Cloak disassembled. Kills 30 skeletons at 16-10. + 15 skeletons.
9. Point 15-9. Cloak disassembled. Kills 10 skeletons. + 6 skeletons.
10. Skeletons 94. Cloak assembled!!! Point 15-10. Kills 25 zombies. +7 liches.
11. Skeletons (hereafter S) 94, Liches (hereafter L) 7. Kills 35 zombies. +11 liches.
12. S94, L18. Kills 50 zombies. +17 liches.
13. L35, S89,S1,S1,S1,S1,S1. Cloak disassembled!!! Occupy Agony city. -3 skeletons. + 60 skeletons. Leave all your skeletons in the castle, totaling 151.
14. L35. Cloak assembled!!! Kill in order at point 21-11: 30 guards; 19-11: 50 ghosts; 20-12: 50 guards. Get 52 liches over three battles (can get 53 if you kill 30 guards first, then 50 ghosts, then 50 guards).
15. L 87. Point 21-13. Kill 50 vampires. + 33 liches. Learn fire from the scholar. Visit stable, mana well.
16. L124, L1,L1,L1,L1,L1,L1. Kill 100 vampire lords. -3 liches. + 69 liches.
17. L 179,L1,L1,L1,L1,L1,L2. Kill 100 Death Knights, occupy Hunt Wind city. -15 liches. + 70 liches.
18. L241. Point 21-13. Kill 50 liches. – 10 liches. + 40 liches.
19. L271. Point 20-13. Kill 60 vampire lords. + 48 liches.
20. L157,L157,L1,L1,L1,L1,L1. Point 19-13. Kill 200 vampire lords. -2 liches. + 160 liches.
21. L477. Kill 50 liches at 18-14. – 10 liches (can be -9 liches). + 40 liches.
22. L507. Kill 150 liches at 19-14. -37 liches. +120 liches.
23. L590. Point 19-14. Kill 50 death knights. + 38 liches.
24. L628. Point 18-15. Kill 70 liches. -13 liches. +56 liches.
25. L333,L1,L1,L1,L1,L333,L1. Kill 10 dragons. -2 liches. +8 liches. +2500 gold. Liches are currently 677. Galthran has moves left, but we will continue moving after resting, as there will be an opportunity to place a black magic amplifier in Cassation.

Moner.

Hire Moner in Agony. Via fire pillar visit the seer's hut at 21-8, take the mage's ring, open passage guard 27-13, visit stable. Rest at point 19-10.
Day ended.

Day two (sad).

Galthran.

1. Build black magic amplifier in Cassation.
2. L671,L1,L1,L1,L1,L1,L1. Kill 30 dragons at 19-16. -1 lich. + 27 liches.
3. L703. Kill vampire lords at 17-13. +90 liches.
4. L787,L1,L1,L1,L1,L1,L1. Kill 400 death knights at 17-13. -6 liches (can be -2 liches). +360 liches. Get angel wings.
5. Put on wings and fly to point 12-14. Put on cloak and kill 100 knights at 10-14. + 90 liches.
6. L1197. Occupy Blackquarter city, destroying the defense consisting of 100 vampire lords. -1 lich. + 90 liches.
7. L1326. Put on wings. Visit well. Open passage guard 12-8. Put on cloak, disassemble it!!! Open Pandora's box at 11-8. +3000 skeletons. Get clone and teleport.
8. L1326, S3000. Point 16-10. Kill 50 skeletons. +50 skeletons.
9. Kill 100 zombies. Point 17-11. Kill 150 ghosts. +250 skeletons.
10. Takes shield. +500 skeletons. Total: L1326, S3800.
11. Kills 400 vampire lords at 16-13. +400 liches. L1726,S3800. Gets golden bow.

Moner.

Takes shield from Galthran. Joins phoenix by opening passage guard. Picks up cursed armor, also by opening passage guard. Gives phoenix and armor to Galthran, takes skeletons.

Galthran.

12. Kills 400 liches, 50 knights, point 16-15 kills 150 liches, kills 399 dragons (clone once), stands in their place and kills 100 knights, kills 400 dragons at 14-16 (clone once). + 1499 liches.
13. L 3225. Wings. Flies to box at 17-21. Cloak. Box bombs (clone once). +2800 liches. Gets dimension door, berserk, vulnerability medal, 500 drash. Stands at point 17-21.

Moner and Caitlin.

Moner picks up water walking scroll, 100 gold pieces. Runs down to the city, stops at point 22-13.
Hire Caitlin in Hunt Wind. Take skeletons and scroll from Moner.
Caitlin to stable. Water walking. Takes liches and phoenix from Galthran.

Galthran.

14. Occupies Rave Raven without losses, breaking 100 drash. + 100 liches.
15. Dimension door at 19-16. Kills 400 dragons. + 400 liches.

Caitlin returns liches to Galthran.

16. Galthran casts dimension door twice and opens passage guard 7-12. Rests at 7-13.

Caitlin leaves skeletons and spearman in the city. Rests at point 14-21.

Day three (more or less).

Galthran (L6525) puts on wings and goes to well. Dimension door twice and opens passage guard 28-11. Door to point 24-16. Exchange wings for city portal. Portal to Rave Raven. Cloak. Box. + 7000 liches. Door to point 18-15. Clear everything remaining (don't forget to disassemble cloak on two groups of guards). At the finish, we get 14925 liches, 70 skeletons. Galthran stopped at point 15-12.

Moner runs into Hunt Wind, hires 412 skeletons, opens box at 27-10 (2000 spearmen), picks up Armageddon's Blade, runs to Agony, hires 412 skeletons, takes 151 skeletons from the city, combines them. Total for Moner - 975, plus 2000 spearmen. Moner takes one step down – moves ended.

Galthran takes undead, spearmen, and Armageddon's Blade from Moner. Jumps to Rave Raven. Transforms non-skeletons into skeletons. Hires 412 skeletons. Total for Galthran is 22683 skeletons. Jumps to Blackquarter, hires 412 skeletons. Total 23095.

Caitlin casts water walking, takes skeletons from Galthran, upgrades them in the fort, gives them back to Galthran.

Galthran gets 23095 skeleton warriors at the exit.

Thank you for your attention.

Sincerely yours, Dmitry_A_S.

P.S. That ring really isn't simple…;)
User Avatar
19 years ago
Auto-translated
Description of the 4th stage of the BLITZ Tournament "Think and Grow Rich"!


DESCRIPTION OF THE 4TH STAGE OF THE BLITZ TOURNAMENT
”Think and Grow Rich”


Greetings, Dear fan of heroes!

Presented for your attention is a small walkthrough manual for the tournament map by VDV_forever.

For a more detailed understanding, as well as convenient and most importantly fast repetition of the walkthrough according to this description, I suggest you print out the RESPA-4 MAP attached below.
The respa-4 map has also undergone a number of changes compared to previous versions used in past tournaments! Now everything is very clear and precise!

List of abbreviations:

G – (gold) gold;
В – question keeper;
К – Armageddon's Blade;
МК – shipwreck site;
О – oasis;
П – portal;
У – scholar;
Х – seer's hut.

P.S. Other objects not marked on the map are either single or objects not visited by heroes.
RESPA-4 MAP
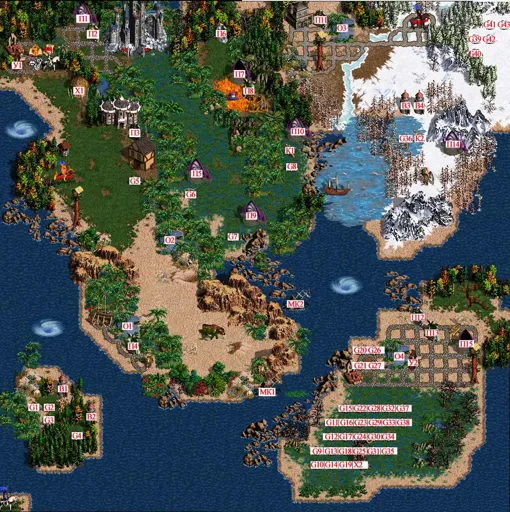

I strongly recommend you keep it at hand when repeating the walkthrough.

Strategy

1. Collect the greatest amount of gold with the fewest number of heroes.
2. Gold collection must mandatory be carried out under the command of the fastest heroes available on the map.
3. Attempt to visit all objects on the map that in one way or another affect the increase of gold in the treasury.

Tactics

1. It was clear that ultimately, no gold should remain on the respa map; at the same time, it had to be based on the calculation: hero cost ≤ gold they can collect.
To achieve this goal, terrain (snow, swamp), ordinary acceleration at oases, as well as hero specialties were taken into account (Fiur – expert pathfinding, Sylvia – basic navigation).

2. The following heroes were chosen:
Valeska (starting hero);
Dessa (runner + large amount of troops);
Calch (hero locked in prison);
Josephine (has a large army, for which snow is native terrain among other things);
Fiur (runner + expert pathfinding);
Moner (fastest runner);
Gunnar (runner);
Kairi (runner); Strange, I always thought his name was Kirry. I think it's an Ambera quirk.
Grindan (runner);
Olema (runner);
Sylvia (has a secondary skill – primary navigation).

3. The following actions were taken:

- Attack on Olema with increasing demons using the basics of demonology;
- The remaining initial army of Dessa and Josephine must also be passed through pit lords on gold (G27).
- Visiting the shipwreck site (МК1), which should increase the treasury by +5000 gold, plus a decent artifact.
- Ignoring objects that would only decrease the treasury: seer's hut (Х1), cows (gorgons), sacrifice altars.

Objects on the map that were not visited at all:
- seer's hut (X1);
- sacrifice altars;
- scholars (У1, У2);
- scroll with "Summon Fire Elementals" spell;
- handcuffs;
- mage's well;
- tavern;
- mahogany observatories;
- gorgons (cows);
- oasis (О2);
- shipyard;
- portals (П5, П6, П9);
- Shipwreck site (МК2) unfortunately could not be visited (minus 2000). It could have been visited, of course, but then point 1 of the tactics would be violated.

Detailed day-by-day walkthrough, or ”11 friends”

- I have gathered you here to inform you of some very unpleasant news: Kyle has puzzled me! Therefore, all of you will have to recall past merits and retrace the entire path exactly as it was in those distant times when dragons, archs, and of course cows inhabited the world!
”It shall be done VDV_forever! Teleport us into the past”, responded all 11 friends.

Valeska


I hasten to inform you that your order was executed in full, although Fiur resisted as much as he could, but his deficiency in acceptable magic did the trick.
…Fire magic obtained by capturing the same fire magic book artifact allowed me to easily break the proud but overconfident Fiur, as follows:

Battle 1


The Fairies were ready to tear me apart, but the 2 cells separating my one and only archer from inevitable death gave me a colossal advantage! I blinded them!
Then I moved the archer to the far end of the battlefield and summoned reinforcements in the form of 20 fire elementals! The Fairies never woke up again…


Having caught my breath from the enraged fairies, I replenished our kingdom's treasury by a whole 13000 gold (G5)! And I stood there wondering where to move next? But since no order followed from VDV_forever, I decided to take a break until better times arrived…

Dessa


- Why me, why again me?
- Such is your fate, and it will be so until you figure yourself out. Who are you? A man, or still a woman?
- You're at it again, VDV_forever?
- Fate is a cruel thing, so forward and may luck help you! Your strength is needed today more than ever! I hope you remember the route…

My wanderings through the first stage of your plan look as follows, wrote "lost" Dessa in the first lines of her letter…

I captured a great artifact, the Elixir of Life! Then through a portal (П2) I ended up in a place that you correctly predicted in the portal (П1) located near the prison. Having freed our common friend Calch, I did not linger for conversation with him, but proceeded to restore my strength at an oasis (О3). But standing there and blocking the spot was not in your plans or mine, so after passing through the oasis once more (step right), I successfully gave way to my friends by stepping onto the road (step down). Thus, the first part of your plan was executed exactly as you indicated.
Awaiting further instructions, Dessa.

Josephine


- A union of sword and plow?
- No, a friendship of nations. Less talk, more action.
- Well, whatever you say…

Following Dessa, I penetrate through time and space via portal (П2), and avoiding conversation with Calch, visit the oasis (О3) and stand in one line with Dessa, clearing the way for Calch.
I have tried to depict the location of our forces on the map under the code name ”SNOW”.
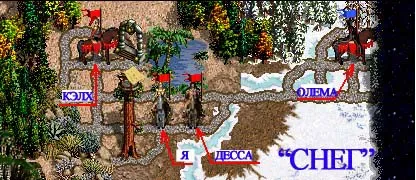

Awaiting further instructions, Josephine
Calch

Allow me to thank you for entrusting such a difficult and promising job specifically to me. Glad to serve you.

Reporting my successes:
1. Having visited the oasis (О3) and continuing my path strictly along its ”coast”, I met Dessa.
2. Presenting her with my ID, issued by you 2 years ago, and showing the "interception" plan approved by you, I took all her army except for 1 goblin, as well as the Elixir of Life artifact!
3. Dividing the hellish spawn in the quantity you recommended: 3 – 5 – 3 (3 for 5 orcs, 5 for 24 goblins and 3 for 7 wolf riders), I attacked the hero Olema.
4. I provide you with the full plan of my actions to implement your ingenious idea.


Battle 2


Turn 1
Everyone passes (press space – full turn skip), except goblins. Goblins advance as far as possible toward the demons.
Demons also approach.

Turns 2, 3, 4, 5
Everyone passes. Demons attack. Goblins run away from demons, moving further from their own concentration. Run in the direction of Olema.

Turn 6
Goblins are destroyed. Move Orcs toward the Demons. Demons move toward orcs.

Turn 7
With 5 hellish spawn, we raise 6 demons from 24 goblins. Run away with them far from the enemy. The opponent's demons continue to attack orcs.

Turns 8, 9
Orcs are destroyed. Raise 3 demons from them using 3 hellish spawn.

Turns 10, 11, 12
Set the riders on the demons. Same result. Riders are destroyed, 3 demons raised from 7 riders.

Turn 13
Overwhelm the remaining enemy demons to death.


After the battle, we get 12 demons!

5. Restore strength again at the oasis (О3).
Captain Calch.

Dessa


In the circle of such wonderful company as Josephine and Calch, I make the following moves:
- Take 1 gremlin from Josephine
- Exchange everything for everything with Calch! i.e., he gets 1 gremlin, and I get everything else, including artifacts.
- Open the question keeper (В4) paying a tribute in the form of 6 demons.
- Stand exactly between the gold (G36) and the question keeper (В3).
- Exactly 1 little step remains, calculated for exchange…

Calch


- well, the most responsible moment has come, good luck Calch!
- forward, to collect gold, - shouted Calch and disappeared behind huge snow mounds.
…We will not see him again, - VDV_forever was forced to sadly state, - gold fever is unfortunately incurable…
- Gold (G40), gold (G39), gold (G42), gold (G41), gold (G43), save me, aaaaaaaaaaaaaa….

Josephine


Well, here is the first Armageddon's Blade (К2)!
Gold 15000 (G36)!

Dessa


Take it all, everything! I don't need anything from you! You are all ungrateful! I did so much for you, and you, you took everything from me!
Josephine, tell VDV_forever that I will never forgive him for this!
To give an order that I remain alone, without anything, with one goblin… is beyond my understanding.
- Sorry Dessa, but I am just following orders, and as you know, orders are not discussed.

Josephine


- Hi Arch! Let's fly together toward fate!
- Whatever you say Joz.
Unfortunately, entering portal (П14) and ending up in another portal (П15), I ran out of all strength, so I helped as much as I could. Figure the rest out yourself, VDV.

VDV_forever


Well, Josephine set me a task, but oh well, must move on, especially since according to plan ”SNOW” everything worked out better than possible. And there is already 30000 gold in the treasury!

Now I will stick to plan ”SWAMP”, the only goal of which will be: collecting gold and the blade!
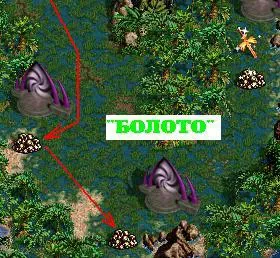


For this, I will need to hire 2 fast heroes: Fiur and Moner.
Well, first I hire hero Fiur, recently killed by my own hero Valeska, and then Moner.

Fiur


Report:
Since I have expert pathfinding, taking the 2 piles of gold you indicated (G6, G7) was no trouble at all.

P.S. I also want to note that when I overdrink, I sometimes get a ”twitch”, interpreted by the Esteemed AmberSoler as a bug.
The essence of this twitch is simple:
My legs carry me much further than without it, i.e., I can reach both the far gold (G8) and the blade (K1), and even make it to the portal (П10)!
But since no instructions were given on this matter, these are just thoughts aloud…
Fiur.

Moner


- And why is the most difficult task of acquiring and capturing blades, gold and other things entrusted specifically to me?
- I answer. Fewer questions, more action. To be honest, it just happened that way, such is your lot! Moreover, you will have to do absolutely everything with your own hands. In general, good luck, Moner, may the oasis help you!

Report

The weather was good, magnificent birds were singing, and lifeless trees stood… Br… what am I talking about???

This portal (П1) stirred my consciousness, and I almost lost my mind when I entered it! Nevertheless, after appearing in a completely unfamiliar place (П7), I was pleasantly surprised that strength did not leave me, as evidenced by the green bar of moves. Taking the first artifact ”admiral's hat”, and immediately feeling like a ”land sailor”, I jumped with great positive emotions into the next portal (П8), and success awaited me again: a golden dragon who stood idle on lava and so eagerly asked for a place in my small army that I simply could not refuse him in this noble endeavor. At the same time, I just wondered how such a strong monster as a dragon did not attack me and tear me to pieces, but decided to join immediately. Concluding that the admiral's hat has some special joining properties, I stopped reasoning about it.
…Golden golems, lava, golden golems, lava, how I love traveling VDV, you have no idea!
Well finally, I arrived at the place (П13), ”ISLAND OF GOLD”
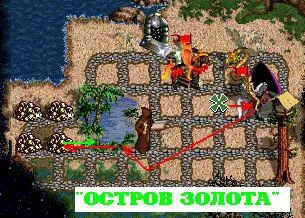


Seeing that Josephine was already waiting for me, I immediately went to meet her. What intuition, VDV! Even 4 flies joined me; they were so frightened that not taking them with me would have been simply ignoble of me!
- How are things Josephine? You look, honestly, not great.
- When I was making my way here, a strongest wind suddenly rose, gusts of which reached 40 meters per second, so say thank you that I saved the whole army instead of losing it on the way!
- Then take a fairy, you won't be able to lose her. She will bring you happiness, protecting you. As for the rest, sorry, I have to take them from you. Such is the will of VDV_forever.
- Thank you Moner and goodbye. I am tired.
- Goodbye Joz.
I bypassed a strange scholar standing in the middle of the road and muttering something under his breath. Who knows what he wants. And I have no time. He's kind of strange. Warn everyone, VDV_forever. He might be dangerous.

Four battles fought by me for the gold reserves (G20, G21, G26, G27) of the ”GOLDEN ISLAND”
were absolutely identical and only one of them was designed solely on raising demons from their fallen, namely:
33 gremlins – for 8 demons;
In the other battles, exclusively 11 hellish spawn and 1 archangel participated.
Here I want to especially note that after each battle for gold, I increased the surge of strength in the oasis!

Thinking that surprises had not ended, guided only by luck, I jumped into another unexplored portal (П12) and with regret noticed that I had already visited all portals and would discover nothing new…

Valeska


… What people, well finally, Moner! Where have you been all this time?
…and after romantic delights, Moner told her his whole story of adventures…
Alas, but we will not see each other again, so to protect you from the enemy, I leave my brave and fearless army for your protection, which will always be able to protect you in case of danger:
14 demons;
1 golden dragon;
1 archangel;
11 hellish spawn;
2 stone golems.
Goodbye dear… and take care of the archer!

Moner


Yes, luck is clearly on my side, everything is with me, all with me, and I am like wind in the sea arriving everywhere; I think I need to run further before she turns away from me!
”On the way I'll see what's happening in the castle”, - I thought, but did not enter, since a half-man, half-bull named Gunnar looked at me hostilely from the castle gates.
”Listen you, whatever your name is Monera. Quickly give back 3 dragonflies and Armageddon's Blade!” – shouted Gunnar during my attempt to cross the castle's country road.
- For what reason should I do that?
- It is an order of VDV_forever!
- You should have said so right away, you boor!
- Say thank you that you haven't completed your mission yet, or else I would have chopped you into pieces, and a malicious and enraged troglodyte would have gnawed your bones!
”This is friendship, this is the black streak. It has begun!” – I thought, looking at this thick-headed, horn-like creature with the fitting name Gunnar!
Having taken 4 flies (dragonflies) and Armageddon's Blade from me, the horn-like one immediately disappeared behind the castle gates, and I headed to complete your approved plan ”Swamp”.
Since flies love the humid element from birth, it is obvious that their native land is the swamp and everything associated with it, so I was not very surprised by the speed with which they carried me through it.
Enriching our kingdom by 25000 gold (G8), I captured another 2nd Armageddon's Blade (K1) into my hands!
Jumping into another portal (П10), I found myself again in the place (П7) where not long ago I talked with the golden dragon. I did not spend my last step, since I knew that perhaps it would be useful for implementing your final plan, which I managed to glimpse out of the corner of my eye during the general gathering at the castle garrison.

VDV_forever


They blocked both exits from the portals, they have no shame and no conscience.
Well, must get rid of Josephine, as sad as that may sound, especially since it's clear from Moner's words she is very tired. We'll hire her next time.
Now Gunnar has everything to start implementing plan ”Island of Gold”. Let's hear what he says…

Gunnar


I bad speak Russian, and write even more, hope You notice:
Went in portal (П1), bypassing scholar, refill strength in oasis (О4), collect 8 piles with gold (G32; G28; G29; G33; G38; G37; G34; G35) and exchange blade armagidona for more 50000 gold, thereby fully complete your task.

VDV_forever


Well as always very detailed briefing from Gunnar! I didn't even want to include him in the development, but oh well, at least he did the job.
P.S. I want to note that in his route there is a little trick that he somehow remained silent about. After visiting the oasis and taking +1000 gold (G32), he stood on the spot where it lay, and only then began collecting gold in the sequence he indicated above.
Well what can you do, if even in his biography it says:
Quote: ”He lacks brains”. I think that says it all.

Continuing the execution of the plan for the gold reserve of the ”golden island”, while sitting in the tavern and sipping a beer, I hire two more gold miners:
Kairi and Grindan. But I send Kairi to gold mining, and leave Grindan in the castle garrison.

Kairi


- I am a specialist in shooters and logistics, not flies and gold!
- Come on, all jobs are good… Especially swamp ones, maybe this profession will be useful to you later.
- In exchange for the centaur, I give you a yellow fly, which has no penalty in the swamp and will lead you to the gold that you need to take!
- By the way, don't even think about approaching the scholar, they say he is…

… Teleporting from one teleport (П1) and ending up in another (П15), I bypassed the scholar and restored strength in the oasis (О4). Then the yellow fly indeed led me to huge gold reserves of the island (G22, G16, G15, G23, G12, G11, G17, G24, G9). I still have a move left to take another pile of gold (G13), but fear of catching gold fever made me dismiss this option immediately, so please excuse me. Everything I could, I did.
Respectfully, Kairi

Grindan


I love gold, not for nothing is my specialty so golden!
Man, they've trampled the road worse than anywhere! You don't value nature, dear friends. Forward fly!

Through portal (П1) I ended up in another (П15), bypassed the scholar and restored strength in the oasis (О4). Ran to the collection point (point where gold G25 used to be) and collected all remaining gold (G30, G31, G18, G19, G13, G10, G14), thereby fully completing your plan ”Island of Gold”.

VDV_forever


- What shall we do friends?
- Fire Calch, definitely!
- And then?
- Are there even options here VDV? Brainless Gunnar of course!
- Fine, that's what we'll do! Now a question:
Who will take on the last and most important brave deed? Implementing plan ”Mysterious Island”? Yes… a forest of hands!
- So: I order you girls Olema and Sylvia to take on this difficult and important task of completing the plan and ending the stage.
First one goes!


Olema


Since you yourself asked that we do everything quickly, then the description will also be quick and short.

1. Took all army left by friends from the castle, namely a troglodyte, a small fairy and a centaur (imp was there initially);
2. Jump into monolith (П1);
3. Appeared at monolith exit (П15);
4. Again into monolith (П13);
5. Exited monolith (П8);
6. Stepped left, once.
7. Moner stepped toward me and handed over everything he had including 1 snake-fly-dragonfly! In return received only a troglodyte.
8. Again portal (П8);
9. Appeared at the exit of another (П4);
10. Visited oasis (О1);
11. Stepped left.

Sylvia


I know you have a sea of work, so also briefly:
1. Jump into monolith (П1);
2. Appeared at monolith exit (П15);
3. Again into monolith (П13);
4. Exited monolith (П4);
5. Visited oasis (О1);

Olema


12. Passed the elixir of life and the click-fly to Sylvia.

Sylvia


6. In auto-battle mode I hit golden golems. Losses: 1 small fairy.
7. Visit oasis (О1) again;

Olema


12. Summoned a boat, spending 8 mana (22 mana left);
13. Entered the ”Hero Doll”, admired myself as ”beautiful”.
14. Sat in it;

Sylvia


8. Took hat and boots from Olema.

Olema


15. Sailing to board the wrecked ship (МК1). In auto-battle mode I kill countless ghosts (50 pieces). Receive 5000 gold + Gnoll King's Shield artifact (Use Armageddon magic).
16. Landed on the island where cows graze, freeing the boat.

Sylvia


9. Summon the freed boat.
10. Entered the ”Hero Doll”, admired myself as ”beautiful”.
11. Sit in the boat.
12. Land on the mysterious island.
13. Open the question keeper (В2) and increase treasury by 25000 gold (G4).
14. Get back on the ship again.
15. Land on the second half of the island.
16. For passage, pay a tribute of 51000 gold.
17. Take the legion statue.
18. All remaining gold. (G2, G1, G3).

Valeska


Entering the guild of free workers, I did the last deed in this not easy tournament: I exchanged all my army for money. By your order, by the way!
1 Arch – 3500;
1 golden dragon – 2800;
11 hellish spawn – 5390;
14 demons – 2450;
2 stone golems – 210.
Only one single and true archer remained…

Total: 141850 gold.

Thank you for your attention!

P.S. Sorry that the ending turned out rushed and a bit disconnected, I have very much work…

Respectfully VDV_forever

User Avatar
19 years ago
Auto-translated
AmberSoler


Walkthrough methodology for the "Think and Grow Rich" map, fourth stage of the Blitz Tournaments.

1. Valeska picks up the Book of Fire (and possibly the Shackles of War – this artifact has a dual purpose on the map, details below) and heads to the outer tavern, near which she takes +13000 gold.

2. In the town, we hire Josephine (under her is Torgrim). We leave 10 gremlins in the garrison (2 of them are planned for removing the terrain penalty when moving two heroes across snow, and 8 are left as insurance, since we may need troops to clear a retaliation when taking 4x1000 gold guarded by Mighty Gorgons – two gremlins per battle). Josephine, with the remaining troops, goes through a one-way portal to the Gorgon island, joins four Flying Serpents, and heads through another one-way portal to the Mercenaries Guild.

3. Valeska hires Dessa (Moner) at the outer tavern, gives her her artifacts (Bow and Speed Boots), keeping only the Book of Fire for herself. She also trades her Archer with Dessa for the cheapest unit – a Goblin. Dessa transfers all her units to Josephine, keeping only the cheapest Gremlin and the Boots. Josephine exchanges all units (except one Gremlin and one Flying Serpent needed for removing the swamp penalty) for gold, resulting in +2933 gold.

4. Dessa heads north, picking up a Scroll (Fire Elementals) and a Vial of Life Blood along the way. We leave the Shackles of War in place – they weren't needed.

Note №1. The Gift. (A small lyrical digression explaining the meaning of the first quest designed for the map).

As is known, Moner has the maximum speed among all heroes that can be hired on the first day – 1936 mp. However, according to theory, any hero who has already been in the game and is rehired has a movement reserve of 2000 mp. The only hero currently available to be used this way without violating the ban on redeeming one's own hero is Fiur, who still belongs to the blue player. Our task is to destroy him for subsequent recruitment under our banners.

Since I am not certain if an opponent flees in the absence of a castle, the Shackles of War were left on the map just in case, but they weren't needed in my walkthrough – Fiur steadfastly endured the battle until the end.

So far, this point is quite transparent and doesn't really fall under the "quest" category. The peculiarity of the task was that a movement reserve of 2000 mp would not be enough (!) to reach both the gold (+25000) and Armageddon's Blade in the far part of the swamp in one day. The only thing that could help Fiur is an artifact increasing movement – Speed Boots, which is exactly what we did first – passed them to him.


5. Thus, Josephine, having the Boots, heads to Fiur after exchanging units and carries out this heroic mission. Losing the battle to him, she passes this important artifact to the opponent.

Note №2. Valeska's Mission.

How can we now destroy the opponent in such a way that his artifacts (which is a crucial point) remain with him? The only way to do this is to win by not winning! :) In other words, we need to destroy Fiur's troops without leaving our own hero alive, so the artifacts don't transfer back to us! For this purpose, we will need the Book of Fire Magic.

6. Valeska attacks the opponent. On the first turn, we cast Fire Elementals, who can subsequently strike the opponent, and put our only living stack – a Goblin – under attack. After its loss, even with the Elementals present, our hero has no chance of survival. Thus, in the end, only Dessa remains on the map, having finished her move at the edge of the swamp. Josephine and Valeska have fallen, however, fulfilling their destiny's mission – creating the super-logistician Fiur.

7. In the town, we hire Torgrim (Kirry), who takes the artifacts (Vial and Scroll) from Dessa, one Gremlin (leaving his Centaur in exchange), and heads to the dungeon via a two-way portal. Having freed Calh, he passes him the Vial of Life. He keeps the Scroll for himself.

8. We hire Moner (Fiur), who takes two Gremlins from the garrison and follows Torgrim.

9. Torgrim speeds up at the Oasis, visits the Observation Tower on the tree, and attacks the opponent with one Gremlin – Olem easily wipes out the poor Gremlin, celebrating victory and rejoicing in a new acquisition – the Scroll that allows summoning Fire Elementals.

Note №3. A Lesson in Demonology.

The second quest left on the map begins precisely with this now-familiar technique – "Alexander Matrosov". :) The hero sacrifices himself, changing the balance of power on the map for subsequent use to his advantage.

The essence of the solution to this quest is as follows.

We need to obtain six Demons for free passage to the second Armageddon's Blade. We have the opportunity to do this using the opponent's (now) strong army and our own Pit Fiends. However, to perform this task, we need a calculator and thorough knowledge of the principles of demonology.

To obtain six Demons (whose total HP equals 6*35=210 HP), we must destroy at least six units whose total health reserve equals or exceeds 210 HP. Therefore, we divide 11 units into two stacks of 5 and 6 Pit Fiends and send the larger stack into battle. The opponent will definitely summon Fire Elementals, who, together with Demons, easily wipe out our six units (and why not – we aren't attacking them or even taking a defensive stance – just moving from one cell to another). Then, the slightly battered enemy forces throw themselves at the remaining five units, who give them a worthy fight, not forgetting to pick up 6 Demons along the way (five Pit Fiends are more than enough for this).


Note №4. Vial of Health.

This was left for possible use if anyone wished to save the Pit Fiends for subsequent exchange for gold (490*11=5390 gold). In that case, one could sacrifice small units from the initial set by significantly increasing their HP reserve. The Vial affects weak units much more effectively than strong ones. 24 Gremlins would be enough (24*9 HP = 216 HP), which could bring an additional 5390 – 2500 (hero hire) – 504 (loss on Gremlins) = 2465 gold.

10. Using the tactic proposed above, Calh obtains 6 Demons and returns to the Oasis to replenish his movement reserve. After that, he trades the Demons for one Gremlin with Moner, dismisses the remaining Pit Fiends, and passes all artifacts (the Shackles of War Olem had, the Scroll, and the Vial) to Moner. Then, he goes for the gold, collecting it all (+7000). The turn is completely finished.

11. Moner clears the passage guard; the remaining single Gremlin allows him to pick up Armageddon's Blade without penalty, the gold (+15000), join Arch and jump through a one-way portal to Gorgon island.

12. In the town, we hire Kirry (Gunnar), who takes all accumulated units from the garrison, approaches Dessa, leaves her a Fairy instead of a Centaur (Fairy is the cheapest unit), takes the Serpent and returns to the castle, stopping one step away from it.

13. We hire Fiur (Olem). Kirry passes him the Serpent (in exchange for the Fairy) and heads through a one-way portal for the Admiral's Hat, after which she joins the Dragon and goes to Gorgon island via a two-way portal. Subsequently, Kirry will spend the rest of her turn moving within this two-way portal, performing dispatch functions and preventing other heroes from spending precious move points on transferring troops and artifacts.

14. Our main logistician Fiur collects all gold in the swamp in one turn and picks up Armageddon's Blade, using his last move points for this.

15. We hire Olem (Astral), leave her in the garrison for now, and immediately hire Astral, who, having only advanced wisdom among his skills, is able to guaranteed learn expert Pathfinding by level five; this is successfully achieved by consulting the scholar and previously exchanging artifacts received from Moner for experience. Dessa and Moner are dismissed.

16. Astral, having the two strongest units in reserve (Arch taken from Moner, Dragon from Kirry), collects all gold guarded by Gorgons (+4000) without much difficulty, not forgetting to speed up at the Oasis after each battle. (The Oasis was also visited before the first battle). Just in case, considering the Deadly Breath of Gorgons, 8 Gremlins were kept with Kirry for insurance, but it turned out they weren't needed.

17. Having passed all units to Kirry (except one Gremlin), Astral collects all gold in the swamp and also completes the quest for +50000.

18. Olem reaches the Oasis near the Shipyard via a network of portals, receives the Dragon and Hat from Kirry, fights the Golden Golems, speeds up at the Oasis once more, and gets into a previously summoned boat.

Note №5. The Wonder Hat.

There is one undocumented point regarding the Admiral's Hat. If you do not open the "hero window" before boarding the boat, the logistics bonus provided by the Oasis disappears and is not converted into sea move points. Therefore, be sure to admire the Admiral's Hat on Olem and boldly step into the boat. As a result, we see three coveted pluses to the left of the hero's portrait. This turn will be enough for us to complete both quests on the neighboring island and return. Just over 50 mp remains in reserve.

19. After completing both quests on the neighboring island, Olem disembarks and passes the Dragon, Hat, and Legion Statue to Kirry. Olem is dismissed.

Note №6. Summoning the Boat.

If necessary, two options were provided on the map to acquire a second boat. Either build it at the shipyard (- 16000 gold) or, more reasonably, summon it with any hero after allowing them to obtain advanced water magic. Basic water skill is taken from the Scholar; advanced is leveled up right there at the Altar using the nearby Shackles of War. This is the second purpose of this artifact. The ideal option for this is Gem. She doesn't even need to level up advanced water, as she has basic, meaning the Scholar gives her advanced immediately.

20. We hire Gunnar (Sylvia), who heads to the boat, receives the Dragon and Admiral's Hat along the way, speeds up at the Oasis, and goes through the nearest whirlpool to the Abandoned Ship (+2000), then to the second one (+5000). The turn ends here (I couldn't think of an economically justified way to return the Dragon for exchange into gold).

21. Kirry, using the rest of her turn, reaches the Mercenaries Guild, where she exchanges all remaining units for gold (+3801 gold).

Thus,

- +146 000 gold collected on the map,
- exchanging troops for gold brought us 2933+3801=6734 gold
- +7000 gold found at sea
- one quest cost - 51000, the second brought +50000 gold
- 9 heroes had to be hired, which cost - 22500

The final result is – 132 234.
User Avatar
19 years ago
Auto-translated
Description of the 5th stage of the BLITZ Tournament "Conservatory"!


vbn


Battle. Labeta: 2 snipers + 1 gargoyle + 1 gargoyle + 1 gargoyle + 1 gargoyle destroys 53 snakes without losses using Slow, Lightning, and Magic Arrow spells.

Labeta learns Literacy.

Battle. Aiden: 2 dragons + 1 griffin + 1 griffin + 1 griffin + 1 griffin + 1 griffin + 1 pikeman destroys 7 archangels, losing 4 griffins, 1 pikeman, and a tent.

Battle Description:
01) Archangels destroy 4 griffins and 1 pikeman.
02) Slow, dragons, and griffin – forward.
03) Haste, dragons – 5th row, last cell, griffins – 3rd row, last cell.
04) Archangels destroy the tent.
05) Create a "defensive" wall with Power Field at (8, 13) – 2 cells to the right of the lake.
06) Griffins hide in cell (11, 7), dragons – in (11, 8).
07) An archangel attacks the dragon through the gap in the wall.
08) The archangel is blinded, and the defensive wall becomes solid.
09) 1st Archangel: wait for the dragon, then attack.
10) Power Field, the dragon returns.
11) 1st Archangel: arrow, wait for the dragon, then attack, the archangel goes to heaven.
12) Power Field, the dragon returns.
13) 2nd Archangel: arrow, wait for the dragon, then attack, the archangel goes to heaven.
14) Power Field, the dragon returns.
15) 3rd Archangel: Lightning, the archangel goes to heaven.
16) Power Field.
17) 4th Archangel: Lightning, the archangel goes to heaven.
18) Power Field.
19) Slow, etc.

Aiden recruits a nomad, takes 5000.
Labeta takes Armor, takes 2500.
Adjit takes 1200 and enters the portal.
Aiden enters the portal, gives artifacts and army to Adjit, leaving behind a gnoll.
Adjit is dismissed.
Labeta enters the portal.
Labeta teaches Serena new spells thanks to Literacy.
Serena takes Armor from Labeta.
Adjit takes snipers and gargoyles from Labeta in exchange for a dragon.
Labeta exchanges the dragon for 3000 and is dismissed.
Serena destroys 45 harpies in Pandora's Box with Lightning and snipers (+10000).
Serena destroys a lone harpy guarding the entrance to the portal and enters the portal.
Serena, taking a rider from Fiur, frees Dessa from Prison.
Adjit enters the portal, recruits 2 riders.
Fiur, having taken all the artifacts and the necessary army, attacks the Conservatory.

Battle. Fiur (4-1-14-4) with an army:
4 riders + 5 snipers + 4 swordsmen + 19 archers + 38 pikemen + 1 griffin.
against 80 griffins and 20 royal griffins.

01) Slow.
02) Snipers attack royals, riders wait.
03) Griffins fly away, swordsmen retreat.
04) Royals approach.
05) Archers attack royals.
06) Pikemen retreat.
07) Griffins approach.
08) Riders attack royals.
09) Blindness on the first griffins.
10) Snipers retreat.
11) Riders attack royals.
12) A griffin flies up to the snipers.
13) Swordsman attacks royals.
14) Royals attack the griffin – without result.
15) Archers and pikemen retreat.
16) Blindness on two griffins.
17) Snipers wait.
18) Riders finish off the royals.
19) Another blindness, then Magic Arrow, shots from snipers and archers destroy the remaining griffins without losses.

Adjit takes 1 angel, opens Quest Guardian, and is dismissed.
Serena takes 2 riders, opens Quest Guardian, and is dismissed.
Fiur takes the Blade and Necklace.
Fiur and Dessa exchange their entire army for gold, leaving themselves with 1 pikeman each.

TOTAL gold: 34041.
User Avatar
19 years ago
Auto-translated
MAP DESCRIPTIONS FOR THE SECOND OFFLINE HEROES 3 TOURNAMENT "DRAGON SPHERE"


vbn


Day 1.

After a preliminary study of the map (editor+nwcwhatisthematrix), I set the completion timeframe at no more than 15 days. Initially, I didn't even dream that it could be completed in 7 days.

I say this because in the first few days of the game, I have a bad habit of buying as many heroes as possible who bring +350 gold, as well as +1 mercury, etc., depending on the map and completion conditions.
As it turned out later, with a 7-day result, a gold-bearing hero brings only 350*6=2100 gold, meaning they don't even pay for themselves. But! An extra hero can still be useful to collect missing chests of gold on time or reinforce an army transfer chain; so let it be a gold-bearing hero who at least partially offsets their existence, and I will spend 5 minutes on save-loading to dig them up (the probability of such a hero appearing in the tavern is 9 out of 150, i.e., about 6%, every 15th-20th hero, 20 load-saves).

Furthermore. Having participated in a same-game tournament twice, I became convinced that a good result can only be achieved using a logistics hero. As a result—I replayed the map 3 times.

1st time - main Gurnisson (Ballista + attack 4 at start), result 8 days.
2nd time - main hero (finally, I got it!) Kyrr, result 7 days.
3rd time - main hero Dessa, significantly increased stats and amount of mercury.


Now I will answer why Dessa in the end. The question of which one to take arose even before the second attempt began. Dessa or Kyrr. I saw that Kyrr had lower initial attack and no spellbook. But she was the one given secondary skills in the order I needed. So I had to play her.

Having completed the map a 2nd time (quickly, since the completion tactic didn't change), I thought about it. Dessa has a spellbook after all, which means she doesn't need to enter her castle to buy one. And that is a saving of almost half a move. And same-half-move for Dessa is equivalent to almost a full move for another hero. So, Dessa!

1) Oh, no. First we have Jelu. From him on this day we need to collect at least 5 wood and 3000 (gold)—500 tavern and 2500 hero. And here he has two options—north or east.

Maybe I'm writing too long, but on the first day of completion, I had 5 heroes. Moreover, each of them was unique in their own way, intended for a specific task that only such a hero (the only one in the game overall) could successfully solve.

So, Jelu went north. Why not east will become clear later. Jelu's "uniqueness"—he was the starting hero. He collects 3500 gold.

2) The second "unique" hero—Gem. It was absolutely necessary to buy her so that the required heroes would appear after her. After buying tavern + Gem, 500 remained in balance. Task for Gem: find 2000. And here there is only 1 option. Not south, because there are 3 chests and she is unable to grab all 3 on this day, meaning someone else will do it. Not east, again why—will be clear below. Therefore, she goes south, and then northwest, where she manages to find 2000.

Aha, I'll pause here again. One might think: why so many heroes, wouldn't it be better to buy an army or save on the municipality? And the answer is this: our most important task is to buy two heroes at once—Dessa and the hero with the ballista. For this, there must be 5000 gold in the treasury. Or calculate moves such that the first hero, say with the ballista, manages to collect gold and return the ballista to the newly bought Dessa. And for this operation we needed as many as 5 heroes, because only then was it possible to simultaneously collect 5000 to buy 2 heroes at once and manage to transfer the ballista.

3) So, the third unique hero became, of course, the gold-bearing hero. And specifically one who could grab those aforementioned 3 fat chests on the first day. There are only 2 such heroes—Grindan and Jelar. Well then, Jelar was dug up faster, so he goes south. At the end of his move, the treasury was rich with 4000 gold. 1000 more were missing.

4) And in the tavern, Pir was already waiting for her same-hour. Exactly Pir! Her uniqueness lay in the fact that only she has a ballista and is also gifted with the logistics skill. This means she will be able to grab this necessary 1000, after which we will buy Dessa and return the ballista to her. And only Pir was allowed to take the chests in the east—that way she didn't have to go far from the castle.

Excellent, wonderful start. I like it. Just like in chess :)

5) And finally, Dessa. She is not proud at all and sacrificed one move cell to approach Pir and take the ballista (well, Pir didn't manage to return from the east!). So, on earth with one sniper and an imp (Pir transferred a centaur)!!! And then, after 10 hours of sleep... Phew! After a 10-hour automatic-ballistic battle with earth elementals, Dessa receives so much experience that she manages to learn the following skills:
Expert: wisdom + logistics + marksman + pathfinder + earth.
Ye-e-es, expert logistics in VDV_forever's gift was not needed. That's why Kyrr was taken at first. She was offered the necessary skills without achieving expert logistics. But Dessa had to level up logistics so that secondary skills would be given later in the correct order. So what! Instead, + 20 snipers. Thanks, VDV!

P.S. Don't forget to dismiss the imp!

Day 2.

Jelu captures the sawmill (and later directs his horse east).
Jelar continues south, where he collects available resources and gold.
Gem returns for one pile of ore, after which she moves west again, where she finds the last free chest and rushes back to the ore mine.
Pir—to the east, and then north, for the campfire in which wood has not yet burned out, so necessary for the Mages' Guild—it's time for Dessa to learn something new.

6) And now, another unique hero appears on the arena, called upon to teach Dessa the spells of the Mages' Guild. Of course, this is a hero with literacy. But it wouldn't hurt if he also tried to pay for himself. No other options—this is Octavia +350 gold (though she starts without a spellbook).

We build the guild, buy Octavia a spellbook, take a sniper and collect wood near the mine. Dessa approaches. Octavia manages to teach her spells and return to the castle gates.

And Dessa is already rushing toward the beholders! She destroys zombies first, then the evil eyes. Dazed, she collects all the gold they guarded and ends her move a few cells away from the monks in the east.

Day 3.

Jelar warms himself at the last free campfire, after which he sets off for home.
Gem collects ore, captures the mine and heads to the mercenaries' camp.

Octavia buys 7 elves, and takes another 6 from the garrison (and centaurs too).
She transfers the elves to Jelu, who transforms them into snipers, after which Pir brings 6 snipers to Dessa, while the rest of the army stays with Jelu.
Jelu rushes toward the goblins in the southeast.

Battles!
4 snip+1cent+1cent+1cent+1cent+12cent+5snip against 250 (hob) goblins. Managed to keep 5 snipers alive, and also collect the guarded gold.

Dessa with 27 snipers and 5 mana (slow, plus unlike Kyrr—spell power 6) destroys 5*20=100 griffins without losses, then easily takes out external griffins, and finally stops before the outer tavern.

7) Grindan, a fast gold-bearing elementalist, Jelar's "brother," leaves the tavern.
8) Following Jelar, Kyrr appears (well, about uniqueness).

The trio of heroes distributes armies: Dessa and Kyrr get one angel each for speed; Grindan gets fairy + snipers.

After this, Grindan finds a unicorn's bowstring in the tomb (after all, he didn't enter the stable, losing 1-2 mercury on this).

Kyrr enters the stable and stops near the vampires.
Dessa after visiting the stable rushes to the well.

Day 4.

Pir reaches the fountain of youth, and with added movement points gets to a chest of gold.

Grindan destroys orcs, takes the chain +4 attack, gives the bowstring, chain and snipers to Dessa and runs for a row of lying chests.
Dessa replenishes mana to 87 (after leveling on griffins they gave basic intelligence), and prepares to attack vampires. For this, Kyrr gives her a second angel.

Battle. Dessa 1 angel+26 snipers+1 angel destroys 150 vampires without losses (used 18 mana—2 slows, 2 arrows; I think it was possible to manage with only slow).

Kyrr takes the gloves from Dessa and back 1 angel, after which Dessa attacks scorpicors (5 mana) and manticores near the green castle. There it is, the mistake! I saw it only now while writing the description, reviewing each save. It wasn't necessary to remove the angel from Dessa. I just wanted to give Kyrr a movement boost the next day thanks to the angel, but for this Kyrr spent a move cell on transfer. In the end, the benefit is zero, and against green now we will have to fight with only 1 angel—a difficult battle, whereas it could have been simplified (actual loss—buying 1-2 extra heroes, which cost 2-3 mercury). Then Dessa kills nearby Gunnar with a pile of beholders (it happened that on this day he was near his castle), captures the empty castle.

In this castle, a tavern is built (though it would have been possible to build the military academy first—loss of 1000 experience), Dessa leaves snipers in the garrison and runs toward the exit from the dungeon. But she only had 3 cells left to run. And look at that luck! At exactly this distance during the turn transition, the second computer-green hero fails to attack Dessa and fails to capture the castle, but approaches the castle closely!

Kyrr rushes south, past utopia, and ends her move before fire elementals.

Jelu with the help of Gem, who buys 7 elves in the mercenaries' camp, transfers a total of 12 snipers to Jelar (seven elf-snipers turned out to be extra—loss of another 2-3 mercury). Jelar manages on this day to destroy troglodytes guarding chests and a telescope.

Day 5.

A very long day. 30 intermediate saves, almost a third of all saves for the game (for other days 10-15 were enough, and there were 100 saves in total in the game).

Jelu hides in the castle to allow other heroes to leave the tavern.
Jelar collects chests and destroys golems guarding resources slightly further south.
Gem manages to collect some resources, after which she is set free.
Octavia rushes toward the mill near the castle.

Grindan collects chests and moves toward the sand.
Pir—her most important role in this game has already been fulfilled, but oh well, let her run around more, you never know—she might be useful (no, she wasn't, had to dismiss her later due to maximum number of heroes).

9) In the green castle we buy Darkstorm (uniqueness—troglodytes and harpies in hero's army).
10) Then we also buy Solmir (uniqueness—initial chain lightning spell), give him 4 troglodytes and move one cell away from the castle.
11) Finally, we buy alchemist Torosar. Uniqueness—presence of a ballista, spellbook and tactician skill. Although now I don't understand why he needed a ballista. Probably, the uniqueness is that initially only he has spellbook + tactician. Although maybe the ballista somehow affected the outcome of the battle with green (but it could have been borrowed from Dessa, and as I said, forgot to take 1 angel). No, unlikely, dragons didn't touch the ballista at all.

In the castle we build a military academy.

Solmir returns to the castle, receives 1000 experience and +1 power at the stellar axis. And with power 4 destroys 1 red dragon and other meat of the green hero (Adjit), after which he dies (no point in them fleeing, no more mana anyway).

Darkstorm also levels spell power to 4, after which twice with a lightning strike he takes out some more meat from Adjit, and then dies following Solmir.

Finally, Torosar, having leveled power to 4, approaches Dessa, takes the bowstring, gnoll chain and angel and attacks green.

Battle. Torosar (primary skills 5-1-4-2, mana 20) v.s. Adjit (6-8-3-5, mana 9).
Basic tactician + 27 snip + 1 harp+1 harp + 1 harp + 1 angel + 29 trogl against
1 RD + 3 medusas + 1 beholder + 1 harp + 20 trogl + 24 skeletons.

Losses: 2 snipers (from magic arrow) + 2 harp + 28 trogl.
The initial placement of heroes on the map and armies in battle can be seen in the attached screenshots.

I note that the outcome of the battle did not depend at all on the presence of morale/luck. And so in all battles throughout the game.

After victory, Torosar gives Dessa all artifacts and army, keeping 1 troglodyte for himself.
Dessa visits the pyramid (experience+explosion), using 5 mana for slow, then Kyrr breaks through fire elementals in the southern part of the desert and opens a passage for Dessa to dendroids.
Dessa uses another 5 mana to slow dendroids, takes the dragon crown (another +8 to stats) and manages to reclaim the contents of Pandora's box from flying snakes.

Battle. Opponent: 350+50 snakes.
Angels move first since their speed is 13 thanks to the necklace of speed taken from the green hero.
Tactic: cast slow on snakes; shoot with snipers, and distract snakes with an angel.
Spell power for Dessa—already 12, so 10 mana was spent (2 slows).

Then Kyrr takes snipers and harpies from Dessa and gives her 1 angel, after which she joins medusas and heads southeast toward the blue castle. At the end of the move Kyrr finally sets the medusas and harpies free to manage to reach the gates of the blue castle tomorrow.

12) In the recently captured green castle we buy a hero who could collect nearby resources south of the castle. And of course, this is a hero from the elemental castle—more movement cells, and of course—this is Tunar-treasurer. Since receiving +1000 experience in the academy, he will now bring 2 times more gold.

13) In the same castle we also buy Rizza +1 mercury.

Day 6.

Jelar collects crystals and heads toward the castle.
Octavia visits the miller near the castle and returns south for snipers, to meet Jelar.
Jelu leaves the castle and moves northwest to take some more resources from a pack of orcs.
Grindan moves across the sand toward chests of gold.
Torosar and Tunar collect gold and resources in the dungeon.

Kyrr breaks through harpies and destroys the first blue hero—Galtran, losing 4 snipers, after which she captures the empty blue castle and takes shelter in it for the night.

And from the castle toward the outer market comes logistics-elementalist Moner, taking 9 snipers from Kyrr.

Dessa heads southwest to the brown castle. On the way she destroys dendroids and earth elementals, visits the tree of knowledge, manages to take a chest of experience and ends her journey before scorpicors.

At night the second blue hero is smashed by Moner's army.

Day 7.

Jelar transfers snipers to Octavia, Octavia—to Jelu, after which the latter takes resources from orcs and the heroes leave the map.

Grindan—on the sand, and Torosar and Tunar—in the dungeon collect remaining resources, after which they also leave the game.

To destroy the last blue hero Adriana comes to the rescue, who using combat magic destroys most of the gargoyles and shooting units of Dragon.

And finally, Ciel, with 12 snipers and a magic arrow expels Dragon forever.

Dessa with 2 angels destroys 25 scorpicors (spent 25 mana—1 slow, 4 heals, but could be achieved with 3, doesn't matter), then 15 manticores (without using magic). Then she captures the empty brown castle, in which a military academy is built, visits the stellar axis and attacks Sinka—the main hero of brown.

Battle!
2 angels against 1 RD +2 KD + 17 beholders + 11 harpies + 41 troglodytes.
Tactic: in army placement mode, angels fly to the upper part of the battlefield so that RD can no longer reach them.

Round 1. Angels wait, Sinka uses last mana points to cast air protection on beholders. KD are destroyed using explosion. Harpies fly in, troglodytes approach. Angels go into defense. RD fly in. They were lucky (all the better)—angels responded once (105 damage).

Round 2. RD strike again, and after angels' response they have 91 HP left. With remaining mana we heal angels. Finish off RD. Harpies move (they were lucky, hit an angel) and troglodytes, beholders shoot. Angels have 275 HP left.

Round 3. Strike on beholders + their strike and angels' response—and only 1 beholder remained, while angels still have 219 HP.

Round 4. Strike on troglodytes etc.

Sinka is crushed!
Losses—1 angel (could have been avoided using mana saved on scorpicors, and even without that, but it's not important now).

After victory Dessa rises to level 20, having stats 14+7+13+12
(including due to artifacts: +4 attack + 4 power + 4 knowledge).
Her skills: expert wisdom + logistics + marksman + pathfinder + earth magic + intelligence + tactician.

Wisdom was useful only for 1 explosion, but could have been done without it.
Intelligence—not useful at all.
Tactician—useful once, but could have been done without it too.

And finally Moner enters the outer market, and after short negotiations 156 mercury appears in the royal treasury.

Last battle—Dessa v.s. Das, 1 angel v.s. 1 harpy.

Victory!
User Avatar
19 years ago
Auto-translated
Fireball


Scouting.

About the map.
At first glance, it makes a pleasant impression - two victory conditions, many chests with money and resources, strong neutral troops, portals, artifacts, a surprise... In general, thanks to sir VDV_forever, the map is a solid 10 out of 10. Also, there are no spells like "Fly" or "Dimension Door" on the map, so it's impossible to reach either the sphere or the computer players directly.

About troops and magic.
Among the useful spells in the guild (levels 1-3 provide "Haste", "Slow", "Precision", and "Force Field"). An assessment of the potential strength of one's own army gives: first week - 3+6+7+7+7+20=50 snipers, 1-9 angels from the conservatory, various same; second - 50 +7+7+8(another +7 if building a castle) = 72(79) snipers, angels as in the first week, there can be very many small units if diplomacy is leveled. A combat test showed that a hero (Aiden was tested) having 70 snipers, "Expert Archer" skill, attack 15(total with artifacts), casting Force Field and Precision, kills 260 gold dragons in ~65 turns, spending 360 mana at magic power 15. From here came the idea to take out the dragons by the second week, ideally within 8 days.
About heroes.
Upon careful consideration, it turns out that only logistics specialists can reach the sphere by the eighth day (even taking the surprise on the first day). Gunnar is already on the map, Kyrr is dismissed due to poor development, leaving Dessa. Testing shows that on this map, Dessa can be leveled up to obtain Intelligence, Earth Magic (needed immediately for taking conservatories), and Air Magic (for the finale), Archery, second tier Luck, and 1st tier Pathfinder (to avoid losing too much time in the swamp). Excellent. To help in the final battle, it is convenient to use the "Slayer" spell, which Coroneus has, plus he has the "Scholar" ability, so he can also bring spells to Dessa who has run far ahead.
About resources.

In the area of the castle, there is only one pile of gems, but there is a mine. 10 are needed for guilds levels 2-3, and 10 for archangels. This means they must be traded or bought. Another problem arises with money - in the vicinity of the castle, there is about 30000 gold, while snipers alone require 20000.... The problem disappears if you take Pandora's box with 30000 gold and 5 gems. However, to take 350 serpents without losses, an Archangel is already needed (the speed of an angel is not enough for the first turn).
Overall, the walkthrough turned out as follows:

Day111:

Jelu, in the company of one sniper, runs up, capturing the outermost pile of wood in passing, and takes two chests with gold 2000+1500, then aims left to take out the gogs. In the castle, we build a tavern and buy Jem there. She leaves all her forces except for a centaur in the castle and heads down toward the area of three chests, where she takes two of them (2000+1000). Then it's Pir's turn to be bought, and she, leaving an imp in the castle and taking a centaur, runs right, takes two chests (1500+1000), and freezes in indecision. We add the fast Moner to the ranks of our valiant heroes, and he runs left for a chest, picking up a pile of ore on the way for the upcoming construction of the Mages' Guild. The chest brings its 2000, and Moner aims for the next chest. And finally, to the solemn fanfare of the orchestra and loud applause, glorious Dessa appears. Leaving the castle in the company of a goblin and a sniper, standing exactly on the square above the watchtower, Dessa signals Pir, who gives her her ballista. Now Dessa is ready to attack "Surprise". In the battle with 500 elementals, the sniper runs into the upper right corner of the battlefield in two turns, and then runs up and down along the right border, fleeing from the stack of elementals. The goblin defends, the ballista fires. After a long time (special thanks to sir vbn for BallistaUbivalk'a), the battle finally ends in a clean victory for Dessa. The experience gained in battle is used as follows: -> 2 wisdom -> 3 wisdom -> 1 archer -> 2 archer -> 1 earth -> 2 earth -> 1 luck -> 2 logistics -> 3 earth -> 1 intelligence -> 2 intelligence -> 3 intelligence -> 2 luck. Tier 3 Logistics is obtained for free. Dessa aims for the castle.

Day112:

Dessa gives 20 snipers to Jelu, who is standing in the adjacent square, after which he attacks the gogs and the orcs, wiping them out without losses. Jem collects the third chest of 1000 gold and runs for the water mill (+500) and a pile of gold nearby (+700). Pir, taking a pile of wood at the sawmill and ignoring the sawmill itself, takes the gemstone mine and aims to collect resources up top. Moner takes the chest on the left for +1000 and runs toward the refugee camp, picking up a pile of ore at the mine along the way. A Level 1 Guild is erected in the castle. Dessa runs to the castle, studies magic (most importantly - Slow!), buys all the wood elves there, takes them (13 units) and the snipers, runs right, takes Knowledge+1 and further right Attack+1.

Day113:

Jelu runs to a rendezvous with Dessa. She takes the snipers from him and gives him the elves (there is not enough of the existing 1300 gold for an immediate upgrade). Dessa, without distracting herself by increasing her magic power (there is simply no time for this), takes the campfire +500 and 5 wood, breaks through zombies and evil eyes. Due to a lack of money, Dessa takes all four chests (3x1500 and 1000) and breaks through monks. Jelu makes 13 snipers from elves. Moner, ignoring the mine, buys high elves at the camp and aims down-left for the golems. Pir collects resources and aims for the elf growth point. Jem picks up a pile of crystals and a campfire (+500 and 5 ore), remaining in that area.

Day114:

Jelu runs to Dessa. She takes 12 snipers from him, and, possessing an army of 35 snipers, opens the first "can". Snipers move first, Dessa casts mass Slow.... Victory without losses. Having received two angels, Dessa opens the second "can". Battle formation: 10 snipers - 2 angels - 11 snipers - 14 snipers. Battle: angels hit royal griffins, killing 8 out of 10; griffins hit the stack of 14 snipers, killing no one; sniper stacks 10 and 11 shoot at the right-center griffins and kill them; 14 snipers take down 9 out of 10 griffins in the upper left pile; the griffin stack cannot cause even a single unit of damage, and two stacks of 10 do not reach on the first try and are quickly exterminated.... Victory again. Dessa reaches another (15th) level and prefers to learn Pathfinding. Having received an angel, Dessa with a formation of 35 snipers - 3 angels storms the last "can". Battle tactics: Slow, attack by angels on royal griffins, finishing them off with snipers; then similarly with the upper left stack of griffins; then run with snipers away from griffins and shoot them, attacking with angels calculating so that they all stay alive.... Victory. Then Dessa runs up to Jelu and gives him all the snipers. Breaking through silver pegasi with a formation of 3 angels - 3 angels without losses (but with effort), Dessa takes the snipers back and takes the Military Academy (+1 attack). Pir takes centaurs from the stable and stands next to the manor. Moner runs toward the golems guarding resources, but doesn't reach them. Jem takes a fairy and 7 great elves from him and breaks through the golems without losses (the elves run out of shots and the remaining golems are finished off in hand-to-hand combat with the help of a first aid tent). Jem picks up sulfur and gems. In the castle, we build a market and buy Coroneus, who heads toward the crowd of royal griffins.

Day115:

Jelu collects chests at the witch's hut, then aims for two upper chests. Dessa takes the shortest path (past the serpents) to the crowd of royal griffins. She doesn't reach them. Moner and Coroneus stand right next to the griffins. Jem takes two piles of crystals and stands right next to the pack of stone golems. Pir enters the manor, but does not buy elves. In the castle, we erect a Level 2 Guild.

Day116:

Jelu, skipping two chests above, runs toward the castle. Dessa breaks through the griffins with a formation of 17 snipers - 1 angel - 2 angels - 2 angels - 1 angel - 18 snipers. The 5 available units of mana are enough for mass Slow. Angels cover the snipers and finish off the griffins at the end. Victory without losses. Coroneus takes all troops from Dessa, preserving their formation, and gives a centaur. Dessa stands two squares below the pile of gold. Coroneus takes the stable, breaks through basilisks (Slow twice on the upper pile) without losses, gains two levels, takes 2nd level Scholar and wisdom. Then he breaks through lords of the abyss (they are on magical ground, so remaining mana goes to mass Slow) again without losses and, having gained a level, studies the long-awaited 3rd level Scholar. Dessa visits the stable, takes forces from Coroneus in exchange for a centaur and attacks the pack of golems, wiping them out without losses. Jem takes an angel from Dessa and in the fort on the hill turns him into an archangel, gives him to Dessa, takes the remaining five angels from her, and stands in the fort. Coroneus heads for the wonderful armor and takes a chest +1500. Dessa stands on the border of the magic plains, Moner takes the stable and takes snipers from her (to speed up Dessa), Dessa runs down, Moner too. Then, with a heavy heart, we exchange 30 mercury for 3 gems, another one is obtained by exchanging crystals. We buy Grindan (or any other elementalist, it doesn't matter), build a level 3 guild, and run with Grindan toward Dessa.

Day117:

Jelu reaches the straight road down from the castle. Dessa runs down to the entrance portal, stopping briefly near Moner so that he can give back the snipers. Leaving the portal, Dessa takes the well and opens Pandora's box. Battle: mass Slow on serpents, fly up-and-down in the right part of the field with an archangel, shoot with snipers, casting Slow as needed. After a convincing victory, Dessa breaks through dendroids, takes the dragon crown and heads toward black dragons (the two levels gained in the process are put into air magic). We buy two gems for money (!) (they become 8). Jem upgrades four angels out of five (one angel will be needed in the final battle for the artifact), runs left and takes the stable, then goes for a pile of gold and slightly up. Moner jumps into the portal and aims for the war machine workshop. Coroneus takes the wonderful armor and runs to the portal. Grindan runs toward Coroneus. In the castle, we buy Rizza (+1 mercury!) and run with her up and left to the point that Pir will reach from the elf hatchery on the next turn. Pir buys 7 elves.

Day121:

Pir buys growth in the elf hatchery, runs to Rizza and gives them to her. We dismiss Pir. In the castle, we buy Caitlin and all the elves. Rizza gives her elves to Caitlin, Caitlin gives elves, archers, and a couple of pikemen to Jelu. Jelu makes snipers and runs to meet Jem. Jem takes snipers from Jelu, gives them and an angel with archangels to Grindan, and then takes the last chest in the vicinity. Grindan gives forces to Coroneus, who also learns all of Grindan's spells. Dessa runs toward the dragons, stopping at the portal on the way and receiving troops and artifacts from Coroneus, learning all spells. Then comes the battle with dragons. It can be played with two formations: "snipers - angel - archangel - archangel - archangel - 2 archangels" and "snipers - 3 archangels - 2 archangels - angel", both lead to victory with the loss of 2 archangels. With the first formation - cast Stone Skin, cover snipers and angel with archangels, then heal the angel and shoot Black Dragons, then heal whoever is more likely to perish. With the second - Haste on the angel, covering, then Stone Skin and again healing. Victory, level put into air. Dessa runs to the well. Moner buys an ammunition cart and gives it to Dessa, then takes a pile of gold. Dessa, jumping through portals, collects sandals and sword, puts on sandals instead of boots. Dessa portals to the location with the Sphere, takes a pile of gold and all chests. With all the money, we buy mercury and dismiss the heroes. In total, before the final battle, Dessa is level 19, stats 17-11-14-16, 280 mana, 72 snipers, 1 angel, 3 archangels, spells "Force Field", "Haste(exp.)", "Precision(exp.)", "Slayer".

Final Battle:
Formation: 72 snipers - angel - archangel - archangel - archangel.
1. First turn - Force Field around snipers, angel and cart; 2 stacks of archangels cover the angel, who then positions himself to be covered by the field. Then the field is set every odd turn, the angel defends, snipers shoot.
2. Haste. Repeat on turns 16, 30.
4. Slayer. Repeat on turns 18, 32.
6. Precision. Repeat on turns 20, 34.
The duration of the battle depends on the frequency of luck and morale triggers. For me it was as follows:
luck worked on turns 12, 29, 30, 32, 38, and morale did not work at all. In the end, victory on turn 43 of the battle.

Total: 8 days, Dessa level 23 with stats 18-12-15-17 (sum 62) and 63 mercury.
User Avatar
19 years ago
Auto-translated
Dmitry_A_S

"Sneaking Kyrr, Lurking Dragons"
Walkthrough of the Dragon Orb map by Dmitry_A_S


Hello, dear reader!
The Dragon Orb map is one of those cases where everything must be described down to the smallest detail. A general concept won't cut it here. Although some may still find what they need and grasp the essence even in the latter case. However, I have kept the battles themselves hidden, leaving room for reflection and subsequent action. Furthermore, I am considering posting files before interesting battles for self-study, so to speak, if you require such a thing, dear reader.
So, the objective on the map (considering the tournament goal) can be called alternatively-unavoidable. Simply put, we destroy the enemies, as it is hard to imagine how many days it would take to destroy 260 gold dragons guarding an "alternative" Orb of Permanence without a Medal of Vulnerability. In any case, far more than 8.

Day 1.

In the opening, we have superhero Jelu with 1 sniper. The city is the Rampart Stronglan, where another 2 snipers are resting in anticipation of the upcoming battles.
Jelu takes a wood pile at 17-9-0 and "transforms" two chests in the surprise area into gold. He spends the night at point 15-3-0.
I build a tavern and hire Jem (perhaps a relative of Jelu) with the intent that Kyrr will appear. Jem takes two chests at 13-23-0, 12-24-0 (gold) and spends the night at point 13-24-0.
I hire Kyrr (so that Pir appears), take one sniper from the city, leave the centaur, take a chest at 22-10-0 (gold) and spend the night at point 16-8-0.
I hire Pir, take the remaining 1 sniper from the city, occupy the sawmill, pick up the remaining wood pile, give the ballista to Kyrr, and spend the night at point 19-11-0.

Day 2.

Computer locations.
Blue: Dragon 60-71-0, Halon 50-64-0.
Brown: Sinka 8-55-1, Das 11-60-1.
Green: Ajit 59-23-1, Gunnar 61-26-1.


Pir takes a chest (gold) at 23-10-0, takes the campfire at 26-6-0 and spends the night at point 30-6-0.
Jem takes a chest (gold) at 13-25-0, occupies the ore mine, takes two piles of ore and spends the night at point 9-19-0.
Jelu visits the windmill at 10-12-0 and spends the night at point 11-13-0.
Kyrr opens a surprise (5 hours of manual combat!!!) and levels up as follows: earth-logistics-shooting-logistics-wisdom-shooting-earth-earth-wisdom-wisdom-pathfinding-pathfinding-pathfinding (sounds very much like cosmonaut communications - ground, ground, do you hear me...).
Next, upon gaining experience, Kyrr studies basic magic-basic water magic-tactics up to expert (don't forget!).
Kyrr spends the night in the city, where it is necessary to build a Mages' Guild and buy Kyrr a book.

Day 3.

Computer locations.
Blue: Dragon 57-60-0, Halon 43-70-0.
Brown: Sinka 16-45-1, Das 21-59-1.
Green: Ajit 57-23-1, Gunnar 61-23-1.

Jem takes a chest (gold) at 7-16-0, runs toward the refugee camp but doesn't quite reach it, and spends the night at point 15-23-0.
Kyrr hires 7 High Elves in the city.
Jelu takes the 7 elves from Kyrr, trains them into snipers and immediately gives them back to Kyrr. Jelu spends the night at point 19-17-0.
Kyrr runs to point 29-6-0; on the way, she visits the Garden of Revelation at 23-14-0 and the Star Wheel at 29-10-0.
Pir takes all snipers from Kyrr (leaving one, of course), destroys a crowd of zombies and a group of Evil Eyes; slightly further down, he picks up four chests (gold).
Kyrr visits the School of War, learns +1 attack and spends the night at point 34-6-0.
Pir spends the night at point 27-7-0.

Day 4.

Computer locations.
Blue: Dragon 60-52-0, Halon 34-69-0.
Brown: Sinka 14-45-1, Das 24-54-1.
Green: Ajit 48-28-1, Gunnar 59-21-1.

Jem hires 7 High Elves at the refugee camp (the fact that they appeared there is obviously another surprise from VDV-forever), transfers all elves, 1 centaur, and a first aid tent to Jelu, and spends the night at point 18-18-0.
Jelu upgrades all elves to snipers and passes them along with the first aid tent to Pir, remaining with 1 centaur, and spends the night at point 26-7-0.
Pir transfers all snipers (leaving 1) and the first aid tent to Kyrr.
Kyrr destroys a group of monks at 39-6-0 and opens three griffin conservatories (leaves the farthest one alone), runs into the Fountain of Youth, destroys 50 Royal Griffins at 44-10-0, and for now stops at point 45-9-0. After the battles, she has 32 spell points left. No losses.
Pir takes all snipers from Kyrr, leaving her with 6 angels.
Kyrr with 6 angels spends the night at point 48-17-0. Pir spends the night at point 44-8-0.

Day 5.

Computer locations.
Blue: Dragon 65-52-0, Halon 37-64-0, Galtran 51-66-0.
Brown: Sinka 11-59-1, Das 30-55-1.
Green: Ajit 43-29-1, Gunnar 52-27-1.

Pir transfers all snipers to Kyrr (leaving 1).
Kyrr visits the stable and destroys vampires at 49-22-0, a scorpicor at 56-23-0, and a manticore at 57-20-1 without losses (15 mana left). She occupies the undefended Blingrot, builds a mana vortex (now Kyrr has 120), leaves 4 angels in the city and spends the night at point 53-26-0.
Pir, having visited the stable, spends the night at point 48-20-0.
Jem spends the night at point 4-14-0.
Jelu spends the night at point 19-17-0.
I press end turn and manage to make the blue hero Dragon stop at the obelisk at 71-57-0.

Day 6.

Computer locations.
Blue: Dragon 71-57-0, Halon 35-57-0, Galtran 54-62-0.
Brown: Sinka 21-58-1, Das 31-61-1.
Green: Ajit 40-29-1, Gunnar 39-26-1.

Jem takes a chest (gold) at 0-12-0 and spends the night at point 10-19-0.
Jelu spends the night at point 14-30-0.
Pir visits a warrior's grave, picks up a bowstring there, attacks a group of orcs at 42-17-0 and retreats.
Kyrr destroys fire elementals at 47-37-0, opens Pandora's box at 47-43-0, losing the ballista and tent (99 spell points left), joins 12 Medusa Queens at 42-46-0, destroys guardian dendroids at 36-48-0, visits the flag of unity at 31-44-0, occupies Mossden, remaining at point 32-43-0.
I build a tavern in Blingrot and hire Darkstorm there (Rizza appeared). Darkstorm visits the stone of knowledge at 65-22-1 and returns to the city, moving into the garrison.
In Mossden I build a tavern, hire Rizza (Malcolm appeared) and move one square down.
I hire Malcolm (SirMullich appeared).
With Rizza, I take 12 medusas, 42 snipers, and 1 angel from Kyrr. With Rizza, I then transfer the 12 medusas and 42 snipers to Malcolm, taking a frozen dragon eye and 1 centaur from him. I hide Malcolm in the garrison. I hire Pir. With Rizza, I transfer 1 angel to Pir and take the bowstring and 1 imp. I transfer the bowstring and the frozen dragon eye to Kyrr. With Rizza, having visited the flag of unity, I spend the night at point 35-49-0. I hide Pir in the garrison.
Malcolm visits the flag of unity and destroys without losses the blue hero Halon, who stopped at point 35-57-0, takes gold at 34-56-0, visits the fountain of luck at 33-53-0, where he spends the night.
Pir, having visited the flag of unity, spends the night at point 33-47-0, even though moves are still remaining (if Pir moves further toward the city of Auer, the blue computer behaves simply outrageously).
Kyrr, having visited the flag of unity, spends the night at point 32-47-0.

Day 7.

Computer locations.
Blue: Dragon 71-61-0, Galtran 56-56-0.
Brown: Sinka 29-58-1, Das 32-63-1.
Green: Ajit 54-24-1, Gunnar 56-22-1.

Pir runs to point 35-48-0.
Kyrr runs to point 32-52-0.
Malcolm transfers 32 snipers to Kyrr (leaving 10), transfers 10 snipers and 12 medusas to Pir via Rizza, remaining with 1 imp.
Rizza with 1 centaur takes gold at 36-50-0 and visits the water mill at 32-49-0, where she spends the night.
Pir takes two piles of gold at 46-54-0, 47-55-0, destroys 20 harpies-witches, takes a pile of gold at 48-55-0 and spends the night at point 50-58-0.
Kyrr with 32 snipers and 1 angel destroys earth-magma elementals at 30-53-0 without losses, takes an experience chest at 18-58-0, destroys a scorpicor at 15-59-0 and a manticore at 14-59-1 without losses (94 spell points left), occupies the undefended city of Shade and hides in the garrison. I build a market in Shade.
Malcolm spends the night at point 29-53-0.
Darkstorm with 4 angels destroys Gunnar without losses and without using magic, then returns to the Blingrot garrison.
I hire Mullich in Blingrot (Gervulf appeared), exchange a pikeman for 1 harpy and spend the night at point 59-24-0.
In Shade I hire Gervulf (Bron appeared). Gervulf takes a chest (gold) at 18-57-0 and spends the night at point 17-57-0.
I hire Bron in Shade. Bron spends the night at point 9-60-0.
Jem spends the night at the windmill at 10-12-0.
Jelu visits the water mill at 7-29-0, takes gold and crystals, takes the campfire at 5-36-0 and spends the night at point 6-34-0.
After passing the turn to the computer, the green hero Ajit attacks Blingrot and meets his end.
Green destroyed.
Darkstorm has 1 angel left (if you try hard, you can leave 2, but it doesn't matter). After battles with Gunnar and Ajit, Darkstorm is "burdened" by 4 artifacts: necklace of swiftness, inexhaustible forest supply, magic medal of mana and crest of valor.

Day 8.

Computer locations.
Blue: Dragon 71-61-0, Galtran hid in the garrison of city Auer.
Brown: Sinka 14-62-1, Das 17-61-1.

Jem takes 4 crystals from the windmill and is dismissed.
Jelu visits the water mill and is dismissed.
Rizza takes 1000 gold from the water mill and is dismissed.
Malcolm takes the campfire at 28-55-0 and is dismissed.
Sir Mullich takes gold at 60-24-0, 60-25-0, takes three chests (gold) below and is dismissed.
Gervulf takes the campfire at 14-54-0, visits the mahogany observatory to get a better view of the area, visits the mystical garden at 16-48-0, takes mercury at 14-48-0 and is dismissed.
Bron takes three chests (gold) at 6-60(61)-0, 7-55-0 and is dismissed.
Darkstorm attacks the abandoned mine at 53-21-0 and retreats. I hire Darkstorm in Shade (Dessa appears) and hide in the garrison, swapping with Kyrr.
Pir hires 3 mages at the tower of mages at 53-60-0, visits the windmill at 57-64-0 and occupies Auer, destroying Galtran (9 medusas and 1 angel left).
I hire Dessa in Auer. With Dessa, I hire 3 nagas.
Pir transfers 9 medusas and 1 angel to Dessa, taking 1 goblin from her, and is dismissed.
Dessa destroys Dragon.
Blue destroyed.
Dessa is dismissed.
I build a market in Blingrot.
I build artifact traders in Shade, and Kyrr exchanges rider's gloves with the traders for 4 wood.
I build a market in Mossden.
Kyrr exchanges the frozen dragon eye for 3 wood.
Darkstorm exchanges the magic medal of mana for 2 wood.
I build a market in Auer.
All artifacts, except the bowstring, are exchanged for mercury.
Darkstorm is dismissed.
Kyrr hires a red dragon, buys a dead knight's blackshard from the artifact traders and with 32 snipers, 1 angel and 1 dragon destroys Medusa Queens at 12-56-0, losing 3 snipers (62 spell points left).
Kyrr visits the library of enlightenment, destroys Sinka, keeping 6 snipers, an angel, a dragon and taking luck clover and ring of life from the poor fellow.
In Shade I hire Aeris (any hero will do), take all artifacts from Kyrr, return to Shade, and exchange artifacts with traders for mercury.
Aeris is dismissed.
I exchange all resources for mercury at the market.
I destroy Das.
Brown destroyed.


Victory!
Everything took 8 days.
Kyrr is level 19 after the final battle and, considering the blackshard, primary skills are as follows: 14-17-8-8.
Amount of mercury - 155.

Thank you for your attention!

Always yours, Dmitry_A_S
User Avatar
19 years ago
Auto-translated
MAP DESCRIPTIONS FOR THE FIFTH OFFLINE HEROES 3 TOURNAMENT "War of the Strongest"


Perpolken


For those with little time!


Day 126 – Dimer (level 9; Skills 4/6/7/7; Magic-70 Experience-13894; -all expert, earth level 1) (Army: Beholders-151, own same as same as Harpy Furies-78, Vampire Lords-10, Flying Snakes-8, Troglodytes-34.) I attack 165 elves (losses are all snakes and troglodytes).

Day 134 - Dimer (level 13 Skills 7/7/8/11 Magic-274 Experience-24818 Wisdom, Logistics, own same as same as Training, Diplomacy. Earth-exp, Mind and Pathfinder-lvl 1) Army (Beholders-172, Harpy Furies-115, Mage-1 and has a caravan). I attack Scorpikors-402, using Force Field. Losses: 1 mage, remaining magic-144)

Day 136 - Dimer kills (Monsters (uses force field and spends almost all magic), Dendroids, Griffins, Liches, Halberdiers) after each battle he visits an oasis. Then he kills a gargoyle and visits the demon pit, runs along the road to the right and down killing cerberi, earth and fire elementals.

Day 141 – Dimer (level 21 all expert. Experience-116671. Skills 9/9/12/13. Army: Beholders-169, Harpy Furies-109) after replenishing the point balance he kills D. Monsters spending all magic on them (force field)

Day 143 - Dimer (level 24 Skills 10/9/13/14 Experience-190196 Magic-280 Army: Beholders-168 and Harpy Furies-107) kills minotaurs (force field, spends all magic). Visits an oasis, gives the army to a secondary hero and attacks mages with 1 harpy (retreats in shame!). He is ransomed in Chillwater, doubles his magic (600 points), takes 1 vampire and runs toward the hydras

Day 144 - Dimer receives reinforcements (9 vampires) and kills hydras (using Starfall). Visits a hut and gains experience. Attacks hobgoblins (retreats in shame!). He is ransomed in Coldshadow and doubles his magic! Attacks dwarves (retreats in shame!). He is ransomed in Alexandretta, takes 105 harpy furies and goes to the Hydras, killing a blue hero on the way.

Day 145 - Dimer (level 28 Skills 12/11/14/15. Magic-564 Experience-367774 Army-105 harpies) kills Hydras (Uses force field and starfall. Remaining magic-243 points). Visits a hut, gains experience. Runs down, attacks cerberi (retreats in shame! Pity those 105 harpies). I am ransomed in Doler.

Dimer (lvl 29 Skills 12/11/15/16. Magic-247 Experience-463511 Army: Beholder-101 Harpy Fury-14 Scorpikor-1) I kill giants (force field, starfall. 17 points left). Visit the Tree. Give part of the army to Moner (he exchanges it for mercury in the mercenaries guild). Dimer with the remaining army visits an oasis, kills a blue hero, back to the oasis and attacks black dragons (retreats in shame!). He is ransomed in White Willow and visits the tree.
Result: Dimer (level 32 Skills 12/13/15/16/ Experience-716 191)


In more detail:

111 – Dimer takes the centaur's axe, kills djinn lords (gets boots), joins troglodytes.
112 – Kills archers, in the witch's hut we take logistics.
113 – I kill iron golems, on the way to them I take a chest and stones. I kill gremlin masters, take a mill, a pile of gold and a stone of learning. Build Stronghold
114 – Run to Castle to replenish magic points; along the way I take 2 bonfires and a chest. Build portal
115 – Having killed storm elementals, I take a chest and sulfur, kill forest dwellers, buy harpies, kill flying snakes.
116 – Enter the portal, join flying snakes, take firewood and open the crypt, return to the portal. Build aviary
117 – Kill griffins (take a cart of firewood). Visit the rally flag. Kill mighty liches and minotaur labyrinth guards. Into the portal and join 10 liches. Build harpy roost
121 – Kill unicorns, clear the manticore den guard, open the dwarf treasury. Buy Darkston; he takes all of Dimer's army except 10 vampires and brings it to the castle. Build tavern
122 – Dimer kills halberdiers, opens the demon pit, joins beholders, kills flying snakes, takes earth. Build town hall
123 – Dimer opens the crypt and runs to the sulfur mine; Darkston takes the ogre shield. Build harpy choirs
124 – Dimer kills flying snakes, takes the mine, runs into the castle. Darkston runs to buy harpies and brings them to the castle.
125 – Darkston transfers the entire army to Dimer, leaving himself 1 flying snake. Dimer joins beholders and takes +2 defense. Build Castle
126 – Dimer (level 9; Skills 4/6/7/7; Magic-70 Experience-13894; -all expert, earth level 1) (Army: Beholders-151, Harpy Furies-78, Vampire Lords-10, Flying Snakes-8, Troglodytes-34.) I attack 165 elves (losses are all snakes and troglodytes). Take resources and board the ship. Darkston goes to collect remaining resources underground. Buy Fiona; she runs to Dimer.
127 – Fiona takes the captain's hat from Dimer and gets in the boat. On the way to the southwest shore, Dimer takes some resources and visits an abandoned ship. Build observatory
131 – Fiona and Darkston collect resources underground and on water. Dimer captures Stronggale castle; on the way he kills cerberi and zombies, takes +1 attack. Build Mages Guild 2 in Stronggale.
132 – Darkston enters the market. I buy 3 more heroes; two collect resources, and the third, Arlak, takes 10 vampires and over the next three days collects resources and captures an artifact (gnoll chain). Dimer kills thunderbirds, snakes, visits the dwarf treasury and returns to the castle. Build Mages Guild 3.
133 – Build Mages Guild 4; Dimer, having learned the necessary spells, crosses the water to the island. The other heroes form a chain to transfer the army and artifacts.
134 – Necessary troops and gnoll chain are transferred to Dimer. Dimer (level 13 Skills 7/7/8/11 Magic-274 Experience-24818 Wisdom, Logistics, Training, Diplomacy. Earth-exp, Mind and Pathfinder-lvl 1) Army (Beholders-172, Harpy Furies-115, Mage-1 and has a caravan). I attack Scorpikors-402, using force field. Losses: 1 mage, remaining magic-144).
135 – Secondary hero upgrades beholders; Dimer kills fire elementals and flies to the southeast shore.
136 – Fiona collects all unnecessary troops (10 vampires, 2 manticores, 14 high elves, 8 dwarves, 38 troglodytes, 1 harpy). She lands on the Northeast shore. Goal: capture 3 castles (Coldshadow, Doler, Alexandretta. The last one was captured in 1/4/4 day 25).
Dimer kills (Monsters (uses force field and spends almost all magic), Dendroids, Griffins, Liches, Halberdiers) after each battle he visits an oasis. Then he kills a gargoyle and visits the demon pit, runs along the road to the right and down killing cerberi, earth and fire elementals.
137 – Dimer kills water elementals and captures the castle (Wild Willow); I build a guild there and stay overnight. Fiona captures Coldshadow.
141 – Dimer (level 21 all expert. Experience-116671. Skills 9/9/12/13. Army: Beholders-169, Harpy Furies-109) after replenishing the point balance he kills D. Monsters spending all magic on them (force field), then kills a gray hero and ifrits. I buy 2 secondary heroes; one goes with Dimer, the second goes to the castle (Chillwater)
142 – Capture Doler castle with a secondary hero (army: 2 manticores and 10 vampires); from it comes hero Moner (2 manticores 1 pixie) toward Alexandretta castle. Dimer enters the underground to replenish magic, killing gorgons in the process; he exits to the surface and goes for the minotaurs, a secondary hero runs nearby. A chain of 2 heroes is formed toward Chillwater castle.
143 – Moner leaves Alexandretta. From Doler comes a hero with vampires and attacks a blue hero (pays him off) and is ransomed in White Willow. Then along the chain, 10 vampires are passed to the last hero, who then captures Chillwater.
Dimer (level 24 Skills 10/9/13/14 Experience-190196 Magic-280 Army: Beholders-168 and Harpy Furies-107) kills minotaurs (force field, spends all magic). Visits an oasis, gives the army to a secondary hero and attacks mages with 1 harpy (retreats in shame!). He is ransomed in Chillwater, doubles his magic (600 points), takes 1 vampire and runs toward the hydras. The rest of the army guards the castle from the gray hero.
144 – Moner captures Alexandretta. A secondary hero takes (105 Harpy Furies) and attacks a gray hero (pays him off for about 9000). He is ransomed in Alexandretta. Dimer receives reinforcements (9 vampires) and kills hydras (using starfall). Visits a hut and gains experience. Attacks hobgoblins (retreats in shame!). He is ransomed in Coldshadow and doubles his magic! Attacks dwarves (retreats in shame!). He is ransomed in Alexandretta, takes 105 harpy furies and goes to the Hydras, killing a blue hero on the way.
145 – Moner, taking 1 manticore, attacked a blue hero. He was ransomed in Chillwater, upgraded the manticore and attacked a gray hero. He was ransomed in Doler.
Dimer (level 28 Skills 12/11/14/15. Magic-564 Experience-367774 Army-105 harpies) kills Hydras (Uses force field and starfall. Remaining magic-243 points). Visits a hut, gains experience. Runs down, attacks cerberi (retreats in shame! Pity those 105 harpies). I am ransomed in Doler, take a scorpikor and go for the Giants.
146 – A secondary hero took (101 beholders) and attacked a gray hero (paid him off for about 15000). He was ransomed in Doler. Transferred the entire army to Dimer.
Dimer (lvl 29 Skills 12/11/15/16. Magic-247 Experience-463511 Army: Beholder-101 Harpy Fury-14 Scorpikor-1) I kill giants (force field, starfall. 17 points left). Visit the Tree. Give part of the army to Moner (he exchanges it for mercury in the mercenaries guild). Dimer with the remaining army visits an oasis, kills a blue hero, back to the oasis and attacks black dragons (retreats in shame!). He is ransomed in White Willow and visits the tree.

Result: Dimer(level 32 Skills 12/13/15/16/ Experience-716 191) This result can easily be improved since I practically didn't correct the first 2 weeks (there are many small mistakes in them). I began to think about my moves more diligently after the battle with high elves. If I could save a couple of days at the start, it would have been possible to also kill mighty gorgons (at point 77,1,0) and visit the hut (at point 13,8,0).

D. Monsters can be killed if you have: a large army of Harpy Furies (300-400 on map 5 necessary castles), magic points (600-1800; there are problems with magic!) and the necklace of speed (sold at the market at point (93,5,0)


Thank you for your attention!
Sincerely Perpolken!
User Avatar
18 years ago
Auto-translated
Dear Players,
A description of the walkthrough for the map of the fifth offline tournament for Heroes 3, "War of the Strongest," by Perpolken has been added.

For now, that's all...
But this topic will be updated... ;)

Statistics

Welcome our newest member: recijeb