

Auto-translated
Classification of tactical techniques in the second Heroes game
The classification of tactical techniques in the second Heroes game has not yet been developed; let's try to create its foundations right now, on April 20, 2010, at 5:24 PM.
For starters, let's reiterate the following idea. To win, we need either superior forces (in a broad sense: this includes magic, hero stats, and troops) or be able to CREATE AN ADVANTAGE IN THE DECISIVE AREA OF THE BATTLE.
A simple example:
An enemy hero attacks us; they have 68 peasants, 10 archers, and a knight hero without a spellbook. We have 18 sprites, 9 halflings, for example. The hero is a sorceress. Let's assume that this situation arose as follows: the leading hero reached the castle and had, say, 3 pigs and halflings. He positioned the pig in front of the pikemen, moved out of the castle to kill it, and then used the halflings to shoot directly. The pigs bravely died, shielding the path to the halflings. Some of the halflings perished. Then, using the last gold, he bought a sorceress in the castle.
The battle:
Formation: 9 halflings - 1 sprite - 1 sprite - 1 sprite - 15 sprites.
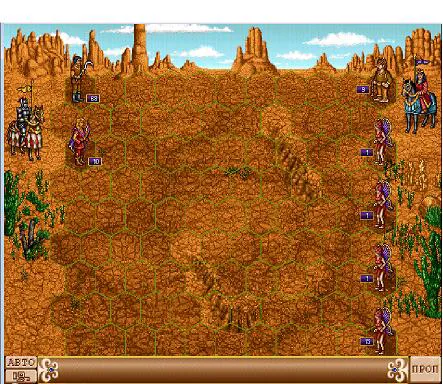
Round 1. Our turn.
Blessing on the halflings. One sprite flies up and hits the archers below, so that the peasants cannot reach (deals 1 damage). Three groups of sprites skip their turn.
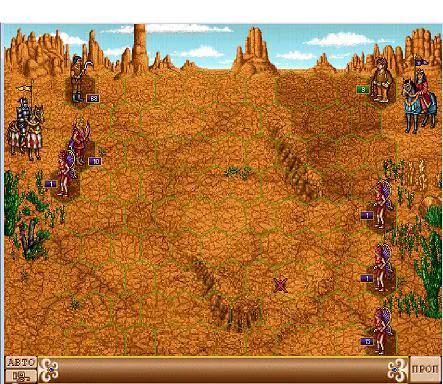
Halflings shoot at the archers and kill, let's say, two (damage 23). Peasants move forward and down, standing in front of the archers. Archers kill a sprite.
Round 2. One sprite flies up and stands two squares above and to the right of the peasants. The second sprite also flies forward and hits the archers below (deals 1 damage). The last group of sprites skips its turn. We cast blessing on 15 sprites.
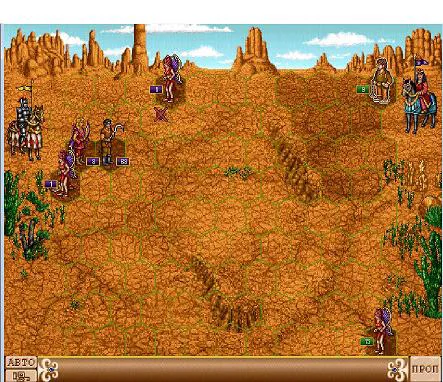
Halflings shoot at the archers (deal 23 damage) and kill, let's say, two. Peasants move forward and kill a sprite. Archers kill a sprite.
Round 3. We cast blessing on the halflings. We hit the blessed sprites from the previous round against the archers below (peasants cannot reach), dealing 29 damage and killing three.
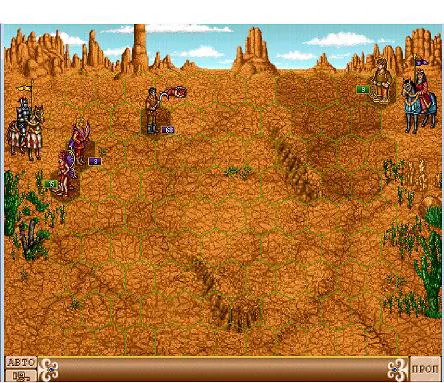
The opponent has 3 archers left, with the last one having 3 health. A total of 23 health. Halflings shoot, dealing 23 damage, and kill all the archers exactly. Peasants move forward.
In the future, we eliminate the archers, then the peasants, without exposing ourselves to attack if morale is possible.
It is easy to see that in case of a more straightforward game, the knight would win. However, by creating an advantage in the decisive area of the game (15 blessed sprites against 2 archers), victory is achieved, and without significant losses.
Total losses amounted to 3 sprites. If the battle had not gone so well, we could have lost 5 sprites (of course, this is assuming that the opponent does not get a morale boost in the first two rounds).
Let's analyze the main tactical techniques used during this battle.
Blocking the archers. I remind you that all archers except mages, archmages, and titans deal half damage in melee combat. This is especially clearly demonstrated in the third round.
Absorbing the blow or Covering the embrasure.
In the first and second rounds, a large group of archers inflicted only 2 life points on us each time. Meanwhile, if they had shot at the halflings, 8 archers would have dealt 38-52 damage, meaning we simply wouldn't have any halflings left. It should be noted that if this group had attacked not 1, but 15 sprites even in melee, the damage would have been 19-26, which would have destroyed most of the squad.
Thus, we sacrificed little to preserve more.
Distraction.
This idea is beautifully implemented in the second round. If the peasants remain near the archers, we will face certain difficulties in the third round (the peasants completely kill the sprite unit even after its unreturned attack under blessing). Instead, we distract the peasants from guarding the archers by offering them one sprite as a sacrifice.
The following tactical technique is used in the subsequent battle:
Hit and run.
When the peasants approach within 2 squares of the halflings, we move the halflings away, taking them out of range for the next turn. Accordingly, in the next round, we shoot, then repeat the procedure.
The classification of tactical techniques in the second Heroes game has not yet been developed; let's try to create its foundations right now, on April 20, 2010, at 5:24 PM.
For starters, let's reiterate the following idea. To win, we need either superior forces (in a broad sense: this includes magic, hero stats, and troops) or be able to CREATE AN ADVANTAGE IN THE DECISIVE AREA OF THE BATTLE.
A simple example:
An enemy hero attacks us; they have 68 peasants, 10 archers, and a knight hero without a spellbook. We have 18 sprites, 9 halflings, for example. The hero is a sorceress. Let's assume that this situation arose as follows: the leading hero reached the castle and had, say, 3 pigs and halflings. He positioned the pig in front of the pikemen, moved out of the castle to kill it, and then used the halflings to shoot directly. The pigs bravely died, shielding the path to the halflings. Some of the halflings perished. Then, using the last gold, he bought a sorceress in the castle.
The battle:
Formation: 9 halflings - 1 sprite - 1 sprite - 1 sprite - 15 sprites.
Round 1. Our turn.
Blessing on the halflings. One sprite flies up and hits the archers below, so that the peasants cannot reach (deals 1 damage). Three groups of sprites skip their turn.
Halflings shoot at the archers and kill, let's say, two (damage 23). Peasants move forward and down, standing in front of the archers. Archers kill a sprite.
Round 2. One sprite flies up and stands two squares above and to the right of the peasants. The second sprite also flies forward and hits the archers below (deals 1 damage). The last group of sprites skips its turn. We cast blessing on 15 sprites.
Halflings shoot at the archers (deal 23 damage) and kill, let's say, two. Peasants move forward and kill a sprite. Archers kill a sprite.
Round 3. We cast blessing on the halflings. We hit the blessed sprites from the previous round against the archers below (peasants cannot reach), dealing 29 damage and killing three.
The opponent has 3 archers left, with the last one having 3 health. A total of 23 health. Halflings shoot, dealing 23 damage, and kill all the archers exactly. Peasants move forward.
In the future, we eliminate the archers, then the peasants, without exposing ourselves to attack if morale is possible.
It is easy to see that in case of a more straightforward game, the knight would win. However, by creating an advantage in the decisive area of the game (15 blessed sprites against 2 archers), victory is achieved, and without significant losses.
Total losses amounted to 3 sprites. If the battle had not gone so well, we could have lost 5 sprites (of course, this is assuming that the opponent does not get a morale boost in the first two rounds).
Let's analyze the main tactical techniques used during this battle.
Blocking the archers. I remind you that all archers except mages, archmages, and titans deal half damage in melee combat. This is especially clearly demonstrated in the third round.
Absorbing the blow or Covering the embrasure.
In the first and second rounds, a large group of archers inflicted only 2 life points on us each time. Meanwhile, if they had shot at the halflings, 8 archers would have dealt 38-52 damage, meaning we simply wouldn't have any halflings left. It should be noted that if this group had attacked not 1, but 15 sprites even in melee, the damage would have been 19-26, which would have destroyed most of the squad.
Thus, we sacrificed little to preserve more.
Distraction.
This idea is beautifully implemented in the second round. If the peasants remain near the archers, we will face certain difficulties in the third round (the peasants completely kill the sprite unit even after its unreturned attack under blessing). Instead, we distract the peasants from guarding the archers by offering them one sprite as a sacrifice.
The following tactical technique is used in the subsequent battle:
Hit and run.
When the peasants approach within 2 squares of the halflings, we move the halflings away, taking them out of range for the next turn. Accordingly, in the next round, we shoot, then repeat the procedure.