


Skip to content

Posts from HALL OF FAME – Stage 2 of the BLITZ TOURNAMENT

Hall of Fame Closed Topic
No ratings yet — be the first to rate!
Closed
Best description!
13 voters
Single choice Closed 2007-07-04
This poll is closed.
VDV_forever
30.8% 4 votes
Radik
15.4% 2 votes
_Lexx_
0% 0 votes
vbn
7.7% 1 vote
Yaroogle
0% 0 votes
Dmitry_AS
7.7% 1 vote
Richard_I
0% 0 votes
fanatic
0% 0 votes
Kamikaze
38.5% 5 votes
Perpolken
0% 0 votes
User Avatar
19 years ago
Auto-translated
This topic is created for voting on the description of the second stage of the "Desert Storm" BLITZ TOURNAMENT NMH III. After the vote, all descriptions will be moved to the general topic HALL OF FAME!

P.S. I would like to remind you that all participants in this nomination will receive Grails!

P.S.S. Original style and spelling are unchanged...


VDV_forever


DESCRIPTION OF THE 2ND STAGE OF THE BLITZ TOURNAMENT!
:smile51:
Good time of day, dear tournament participants!

After reviewing the map, several possible walkthroughs were considered:

1) Recruit +20 spearmen (K1) and immediately go to the water source! Kill the spearmen (K2), water source, portal, kill 100 spearmen (K4), +500 gold (G8), +1000 gold (G9), oasis, artifact, portal, oasis, take all remaining gold at the top.
TOTAL: 22000 gold.

2) Level up the hero at the water source (killing two groups of spearmen, K1 and K2), arrow, portal, oasis, kill 40 spearmen (K3), oasis, kill a hundred spearmen (K4), gold (2000+3000, G5 and G7), oasis, artifact, portal, oasis, 1500 (G6) +3000 (G5) +5000 (G3), prison.
1-1) Lower oasis, gnomes, 5000 (G11), 1 sulfur (S2), 1 sulfur (S1), 25000 (G11).
TOTAL: 44500 gold

3) Level up the hero at the water source (killing two groups of spearmen), arrow, upper portal, kill 100 spearmen, 500, 1000, portal, oasis, kill 40 spearmen, oasis, artifact, portal, oasis, take all remaining gold at the top, prison.
3-1) Lower oasis, gnomes, 5000 (G11), 1 sulfur (S2), 1 sulfur (S1), 25000 (G11).
TOTAL: 50000 gold

4) With nomads.

I stopped at the fourth option because I knew that nomads do not have a penalty in the desert, but harpies do on the swamp. It was this knowledge that was taken as a basis for completing this tournament.

For convenience and easier reading, I recommend looking at MAP RESPA 2!:)
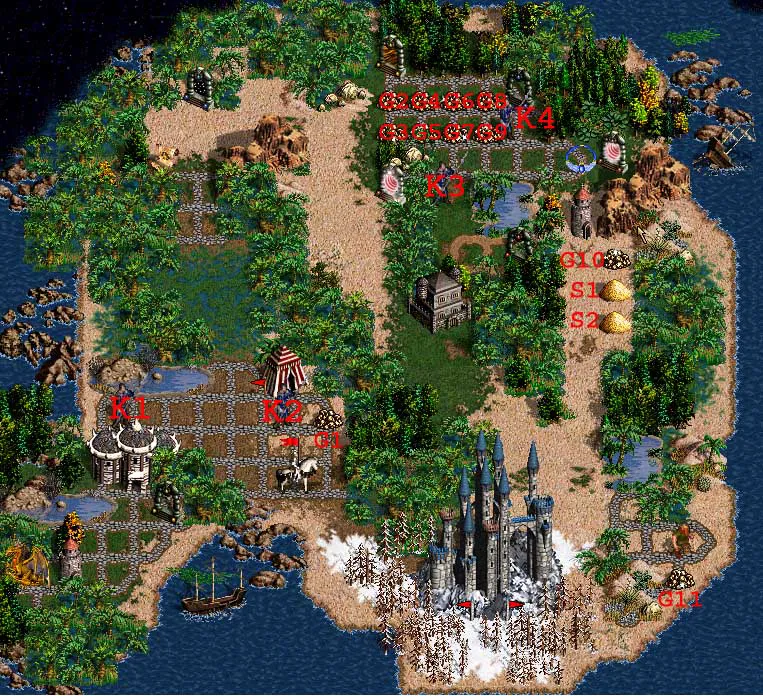


So, let's go:

The first six moves look like this:
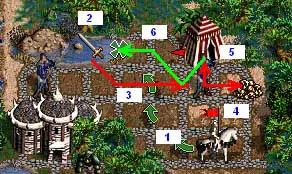


Hiring one nomad is not enough to successfully capture the prison, so Sylvia needs to be leveled up properly.
To do this, you need to move as shown in picture 2.
Level up Sylvia at the water source (1), without losses, defeat 20 spearmen (2) (K1), (use harpy to fly, use spearmen to attack each slot) and increase her movement points further without moving from the spot, immediately after the end of the battle (2)!
Attack the next group of spearmen (3) (K2), kill them without losses. Standing still, take 200 gold (4) (G1), hire a nomad (5), and visit the water source again, leveling up Sylvia almost to the maximum!
Next, we make the most important moment in the game!

WE DISPERSE THE SPEARMEN AND SWAP THE NOMADS AND HARPIES! I.E., IT IS NECESSARY THAT IN THE HERO'S SLOTS, THE NOMAD STANDS TO THE LEFT OF THE HARPY, THIS IS WHAT WE NEED!

We point the mouse cursor at the prison and see that now Sylvia can reach it without any problems (If you swap the harpy with the nomad, Sylvia will not be able to reach the prison for exactly 3 moves)!

In this way, freeing Orin from captivity, Sylvia's turns end.

FUN ADVENTURES OF ORIN

Orin doesn't hesitate and takes all the artifacts, the harpy, and the nomad from Sylvia, leaving only one griffin for Sylvia.
He runs straight to the oasis, increasing his movement points.

Here, I would also like to note the following trick:
Orin has the harpy on the left and the nomad on the right, but there is no penalty anymore!
This is how tricky Orin is.

After losing -31 mana, life becomes a little more complicated, but nevertheless, the glorious spell of fire wall successfully did its "dirty" job.

Battle with 30 gnomes +5 combat gnomes

Turn 1
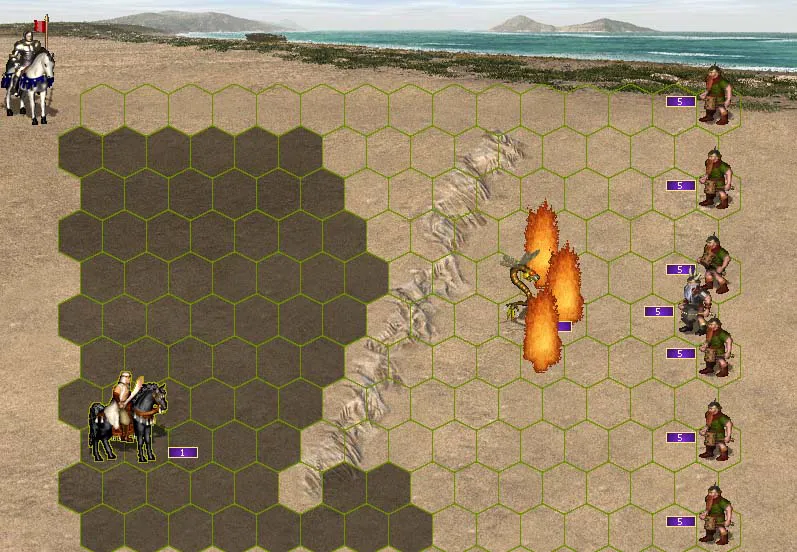


as can be seen from the picture, in the first turn, Orin casts Fire Wall at the indicated location. The harpy stands on the cell between the three created fires, thus provoking the trusting combat gnomes to commit suicide.

Turn 2

Since an army of one nomad and one harpy is not really an army (one cannot win a battle alone), it is impossible to kill the remaining 5 gnomes with such forces, so we cast the fire wall again, as shown in the picture, and skip our warriors' turns by pressing the spacebar:
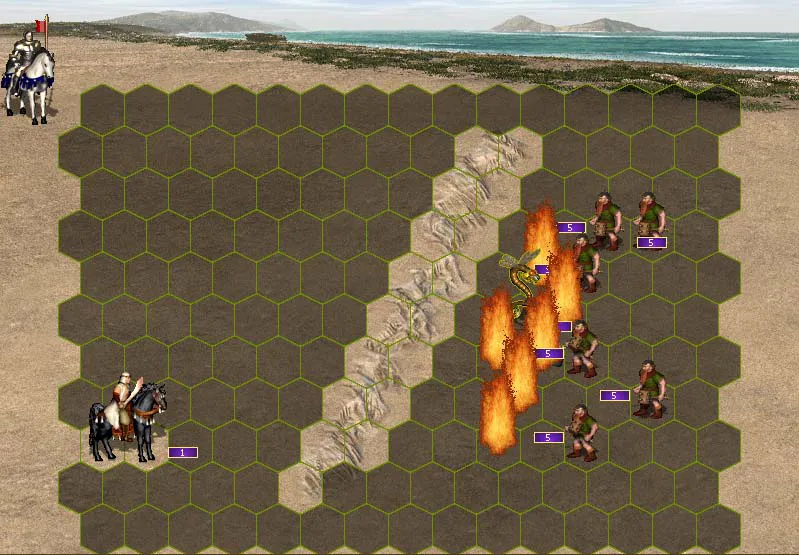


all six gnome slots die under the flames.


Orin takes 5000 gold (G11) and levels up again at the oasis.
Then he takes 25000 gold (G10) and 2 sulfur (S1, S2).

Please pay attention to the following important point!
Gold and sulfur must be taken in such a way that after taking these trophies, there are as many movement points left as possible. To do this, use the method: "taking trophies without penalty".
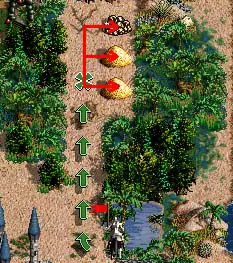


He takes the long-awaited artifact guarded by two spearmen. Be sure to put it on himself and go through the monolith entrance to level up at the oasis and recruit 40 spearmen (K3)!
Then he takes gold in the following order:
G7, moves one step up, i.e., stands on the spot where the gold (G7) used to be, G5, G4, G6, G8, G9!

Attacks K4.

Battle with 100 spearmen.

Turn 1

Mana 7. This is enough for one fire wall. And it is very important where to cast it. Knowing that its effect lasts only 2 turns, you need to kill as many spearmen as possible during this time! The next picture shows the zone where the most suitable place to place it is. And the army should be located accordingly.
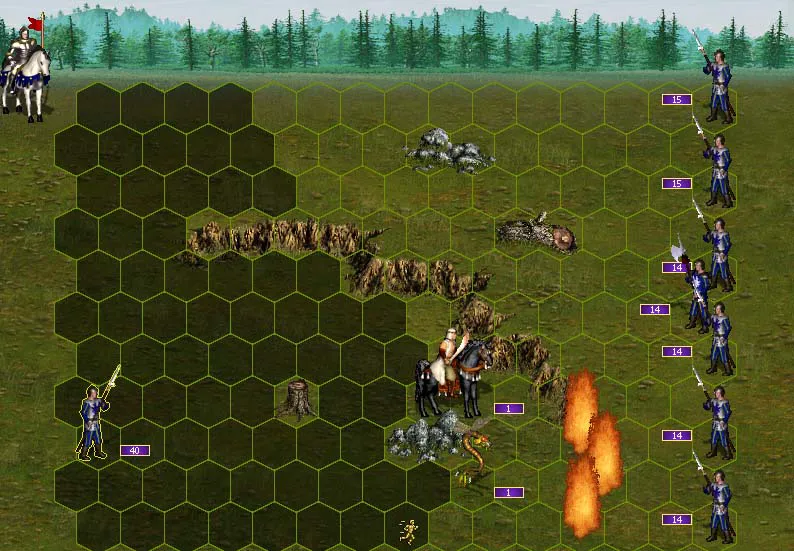


The spearmen all rush into a fair fight towards us.

Turn 2

Here, special importance lies in moving our harpy. By moving her exactly like this, we essentially win the battle because fighting 5 spearmen in 4 slots is completely predictable even on auto-battle. Which I actually do after the spearmen's turn ends.
The tricky move of the harpy is clearly illustrated in the following picture:
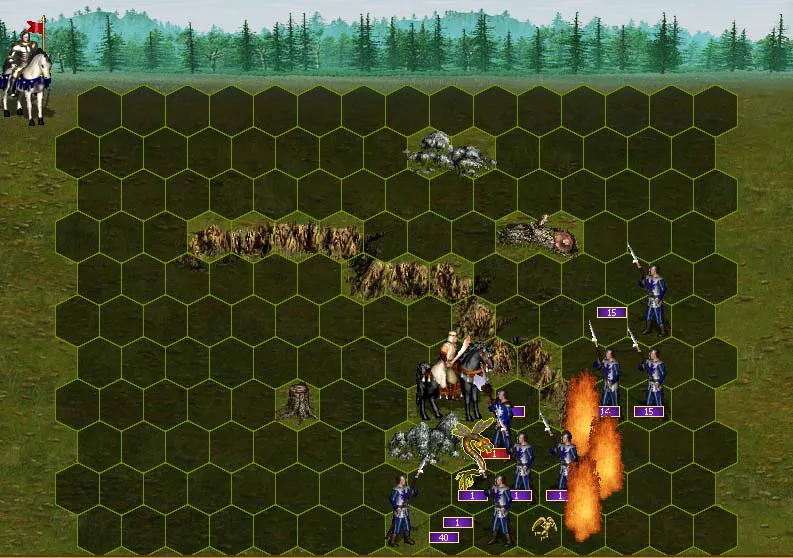


After an unconditional victory, we get:
+1 to defense skill;
main logistics;
+2000 gold.


Orin visits the oasis again, and after drinking fresh water, his strength is partially restored. These forces are enough for the remaining two piles of gold (G2, G3), for the portal leading to the golden dragon, for the guild of free workers, and finally for the water source!
Before visiting the water source and replenishing his strength again, Orin exchanges all his warriors for gold at the guild of free workers (leaving only one fearless spearman).
Having replenished his strength at the water source, he attacks the guardian question, paying a tribute of 51946 gold.

Attacking the golden dragon, he gets grandmaster level, as well as gifts:
Armageddon's Blade
51946 gold
1 golden dragon.


In conclusion, without hesitation, he achieves absolute results on the map by exchanging the received dragon for 2800 gold.

Final result: 1 day, 54746 gold.

P.S. Unused artifacts: book of earth magic, skull helmet, amulet of freedom, frozen dragon eye. The map can also be completed without the following artifacts: ring of the wanderer and boots of speed.

Sincerely, VDV_forever

Attachments 7
7 files attached • Total size: 655.4 KB
User Avatar
19 years ago
Auto-translated
Radik


Walkthrough of the second blitz tournament

The walkthrough of the tournament map can be conditionally divided into two stages. The main task in the first stage is to get Sylvia to reach the prison at all costs; otherwise, it will not be possible to complete this tournament within one day and demonstrate "top-notch skills." In the second stage, Orrin must defeat the dwarves and a hundred spearmen without losing anyone. Essentially, the first part requires knowledge of basic logistics, while the second requires combat skills.
So:
1. With Sylvia, visit the reservoir, thereby increasing her movement range by 400 MP.
2. Move left along the reservoir and attack 20 compliant spearmen, but refuse to recruit them and kill them without losses (although losses here are not critical; the main thing is to save the dragonfly).
3. Visit the reservoir again, moving right. The movement range increases again because a battle took place; that's why you had to kill the compliant spearmen.
4. Attack 20 bloodthirsty spearmen and kill them without losses.
5. Enter the nomad tent, diagonally collect 200 gold coins, and buy 1 nomad. We absolutely need the nomad so as not to receive a desert penalty on the way to the prison, since having even one nomad in the army allows you to move through the desert without terrain penalties.
6. Visit the reservoir again to replenish the movement range.
7. An important point: dismiss the existing spearmen. This needs to be done to avoid receiving a penalty when crossing swampy terrain, since the hero does not receive a penalty on the swamp if his army consists of units native to the swamp (the nomad doesn't count, as it is a so-called neutral unit that does not belong to any of the castles). Be sure to position the dragonfly to the right of the nomad; otherwise, the swamp terrain penalty will apply.
Screenshots for clarity:
1) Sylvia with spearmen (she lacks 423 MP).

2) Dismiss the spearmen, and Sylvia reaches the prison perfectly!

8. Run to the prison and free Orrin.
9. With Orrin, make one move down, then take all the artifacts from Sylvia, as well as the dragonfly and the nomad, leaving her only one griffin – during an exchange at the Free Workers Guild, the dragonfly is worth 28 gold more than the griffin, and the nomad costs the same.
10. Enter the oasis with Orrin, thereby replenishing the movement range by 800 MP, and run to attack the dwarves, encountering an event along the way that takes away 31 mana points out of the 50 that Orrin has.
11. Orrin's army is terrible for melee combat against 35 dwarves, so all hope lies in magic; fortunately, Orrin has a book of fire magic and an expert secondary skill in fire magic. Using the spell "wall of fire," Orrin simply burned the poor but bloodthirsty dwarves while they were trying to reach the dragonfly and the nomad. The battle itself: cast wall of fire and approach closer with the nomad and dragonfly, luring the dwarves towards them

Then just stand there, remembering to cast wall of fire again at the beginning of round 3 in the same place, and wait until the stupid dwarves burn themselves. As a result, the dwarves burned without even having time to wave their hammers; losses are 12 mana points.
12. Next, diagonally collect 5000 gold and go back into the oasis to replenish the movement range.
13. Run up to collect sulfur and gold. Collect it as follows: approach the pile of sulfur, stand next to it on the left, and take it directly, not diagonally. Do the same with the other pile of sulfur and 25000 gold.
14. Open the question guardian and pick up the amulet of divine grace without any problems by killing two spearmen guarding this vital artifact (which you should remember to equip before the battle with 100 spearmen).
15. Dive into the monolith entrance with Orrin and emerge near the oasis, which we will definitely visit.
16. Make one move to the left, attacking 40 compliant spearmen, whom we successfully recruit.
17. Attack a hundred bloodthirsty spearmen, whom we kill without losses, again burning them with the "wall of fire" spell (it is very important not to lose a single unit; otherwise, there will be no "top-notch skills").
18. The battle itself: The most important thing is to make all seven groups of spearmen pass through the wall of fire (cast at the beginning of the round). To do this, you need to correctly position your troops on the battlefield because the behavior of the AI depends on the placement of your units. With the arrangement you see in the screenshot, all seven groups of spearmen pass through the wall and burn almost completely. In the first round, four groups pass – the halberdiers burn completely, and three groups are left with one spearmen each.

At the beginning of the second round, hit the spearmen standing opposite the nomad with the dragonfly. Also attack him with the nomad, and kill the top spearmen from the remaining three with the spearmen.
Then it's the enemy's turn; the result of his move is shown in the screenshot.

And then just beat up babies.
As a result, there are no losses, 1 mana point remains, but that doesn't matter anymore since there is nothing else to fight.
19. Visit the oasis again and start collecting gold. After picking up all eight piles, dive into the monolith entrance and emerge near the Free Workers Guild and sell all your units. As a result, we get 51946 gold. This is exactly how much is needed to go through the question guardian (that's why I mentioned throughout the story that it is important not to lose anyone in battles).
20. Visit the reservoir, open the guardian, and attack the compliant golden dragon, which we successfully recruit, receiving back 51946 gold and Armageddon's Blade. Run back to the guild and exchange the golden dragon for gold, so our treasury has 54746. Orrin still has movement range left for 3 cells on the road.

That's it, Game over! Read PhysMig, and everything will work out for you.
Attachments 5
5 files attached • Total size: 317.0 KB
User Avatar
19 years ago
Auto-translated
_Lexx_


1. We head to the water source and adjust our turn.

2. We kill the spearmen and increase our movement range again.

3. We attack the second group of spearmen and defeat them.

4. Then, we enter the nomad tent, collect the rightful 200 gold, and hire one nomad. And dismiss the spearmen.

5. Again, we go to the water source; since we removed the spearmen (slow units), we can reach the prison. There, we free Orin.

6. Since Sylvia has no more turns left, we switch armies and take the artifacts. With Orin, we head to the water source to increase his movement range. Losing 31 spell points. We attack the Gnomes.

7. Using a simple but powerful spell like Wall of Fire, we easily defeat the gnomes.

8. After collecting 5000 gold, we go to the water source and head for resources and to unlock an outpost. 2 sulfur is needed for the Guardian, and we keep 25000 for ourselves.

9. We take the Necklace, kill 2 spearmen, and enter the Monolith entrance. Since we had a battle, we go to the water source to replenish our turn.

10. Not forgetting to put on the necklace, we recruit 40 spearmen and attack 100 spearmen.

11. We cast the Wall of Fire spell and arrange the army according to the presented plan.

12. After the spearmen move, we arrange the army as follows.

13. We simply skip 2 turns; here's the result of the first skipped turn.

And the result of the second skipped turn – victory, 2000 gold, and basic logistics.

14. Immediately head back to the water source to replenish our turn. And collect the gold as shown in the picture. By collecting the gold counterclockwise, we stand at the location of the last pile.

15. Now, we collect the gold clockwise. Standing at the location of the last pile of gold we took, and enter the Monolith entrance.

16. We go to the Free Workers Guild and sell all workers except for one spearman. We visit the water source, then unlock the Guardian (giving him 51946 gold), and approach the dragons.

17. They join us, giving us Armageddon's Blade and returning all our gold.

18. And we head back to the Free Workers Guild again.

19. We sell the Golden Dragon for 2800 gold, and our treasury now amounts to 54746 gold.
User Avatar
19 years ago
Auto-translated
vbn


Sylvia's turn.

01) Enter the spring (increase movement points).
02) Kill 20 pikemen near the spring (without losses).
03) Press the spacebar on the spring (increase movement points).
04) Kill 20 pikemen near the nomad tent (without losses).
05) Dismiss 20 pikemen.
06) Enter the nomad tent.
07) Pick up 200 gold.
08) Buy 1 nomad.
09) Enter the spring (increase movement points).
10) Free Orin from prison.

Sylvia's turn ends, and Orin's turn begins.

Orin's turn.

01) Orin gives away the griffin, takes the Flying Serpent and the Nomad.
02) Visit the spring near the dwarves (increase movement points).
03) Lose 31 mana (19 remains).
04) Attack 35 dwarves, using 6 mana once for the Fire Wall spell (without losses).
05) Take the guarded gold.
06) Visit the spring (increase movement points).
07) Collect sulfur and gold.
08) Pass through the quest guardian #1.
09) Take the Necklace.
10) Visit the oasis.
11) Recruit 40 pikemen.
12) Attack 100 pikemen, using 6 mana again for the Fire Wall spell (without losses).
13) Visit the oasis.
14) Collect all the gold around.
15) Exchange the entire army (1 serpent + 1 nomad + 40 pikemen) for gold at the mercenary guild, leaving only 1 pikeman.
16) Visit the spring (increase movement points).
17) Pass through the quest guardian #2.
18) Recruit 1 golden dragon.
19) Exchange the dragon for gold.

TOTAL: Days: 1. Gold: 54746. Remaining mana for Orin: 7. Remaining movement points: 3.
User Avatar
19 years ago
Auto-translated
Yaroogle


Sylvia:
water body
attack on spearmen without losses (refusal to accept)
water body
attack on spearmen near the tent without losses
dismissing spearmen
gold
tent (buying a nomad)
water body
prison

Orrin:
trade (everything to Orrin, except the Skull Helmet and his griffin)
oasis
attack on dwarves without losses (fire wall)
gold
oasis
sulfur
sulfur
gold
question guardian
artifact
monolith
oasis
joining spearmen
attack on spearmen without losses (fire wall)
oasis
all gold
monolith
water body
guild (trading all except 1 spearman)
question guardian
joining a gold dragon
guild (trading the gold dragon)
User Avatar
19 years ago
Auto-translated
DmitriyAS


“To kill or not to kill, that is the question!”
Walkthrough of Blitz 2 (DesertStorm map) by Dmitry_A_S.

We visit the water source at 6-12, attack the pikemen at 5-12, and kill them. Thus, we have visited the water source at this point, gaining the bonus of extra turns – twice.
We attack the pikemen at a right angle at 8-13 and kill them. We take 200 gold, hire 1 nomad, and visit the water source.
We dismiss all pikemen from the army.
We free Orrin from prison. We give him the dragonfly and the nomad, all artifacts (though we can keep the Spirit of Despair and the Hourglass), taking the griffin.
We visit the oasis at 19-15, attack the dwarves (put the Spirit of Despair and the Hourglass in the backpack), and with the help of the Wall of Fire spell (cast once), we kill them. We pick up the gold at 21-18. We visit the oasis. We pick up two piles of sulfur and a pile of gold at a right angle. We open the passage guardian (hopefully not the back one). We pick up the necklace, killing 2 pikemen. We dive into the monolith at 19-5. We visit the oasis. We add 40 pikemen to our army. We kill 100 pikemen without any losses on our side (cast the Wall of Fire spell twice). We visit the oasis. We pick up all the gold on top in the following order (14-4, 14-3, 15-4, 15-3, 13-4, 13-3, 12-4, 12-3) and dive into the monolith at 12-2.
We visit the water source. We visit the Free Workers Guild. We exchange all units for gold there, leaving ourselves with 1 pikeman.
We open the passage guardian at 2-18. We add 1 gold dragon to our army, taking Armageddon's Blade with us. We exchange the dragon for gold at the guild.
In total, we have 51946 tugriks.

Sincerely, Dmitry_A_S.
User Avatar
19 years ago
Auto-translated
Richard I


Sylvia
0. Start of turn (+1560)
1. Run to the lake (-240)
2. Capture the lake (+400)
3. Attack the spearmen at the lake (do not recruit!) (-50) *
* In this and other battles, it is important to preserve the Serpent, although you can avoid losing anyone altogether.
4. Automatically capture the lake (+400)
5. Attack the spearmen near the tent on the left (-170)
6. Enter the tent diagonally, capture the resource diagonally, and buy a Nomad (-140)
7. Run to the lake (-190)
8. Capture the lake (+400)
Total: 1560 + 410 = 1970 turns
(alternative: attack the spearmen near the tent immediately, then at the lake = 1870)
Since the Serpent flies well over the swamp, and the Nomad doesn't care, we'll keep them. Dismiss the spearmen, as they slow down the unit. It is important that the Nomad is at the front of the unit, leading the way, otherwise we will get bogged down in the swamp.
Sylvia has just enough turns to reach the prison.
Orin
0. Orin, after being freed, goes down to the cell below and takes everything from Sylvia in exchange for the Griffin.
1. Capture the oasis, give away 31 mana.
2. Attack the lumberjacks (use the Wall of Fire spell, as mines are too expensive). **
** It is important to preserve the entire army, and to make sure the Tangarams don't get lucky, equip them with morale-reducing artifacts.
3. Capture 5000, the oasis, and head north.
4. Collect sulfur and 25000 gold at a right angle.
5. Open the gate, take the necklace (it makes fighting easier).
6. Dive into the pink door, capture the oasis, and recruit the spearmen (they are needed for the ritual).
7. Attack a hundred spearmen (good thing there is mana left). The Wall of Fire spell helps again. There is even enough mana left for one more battle. Of course, no one is lost. (received 2000 gold)
8. Capture the oasis again.
9. Collect all the resources at a right angle (18000 gold).
10. Dive into the brown door, sell everyone at the market (except for the personal squire-spearman) (+1946 in the treasury)
11. Hooray! There is just enough to get to the golden dragon, of course, after drinking at the oasis.
12. The wise dragon joined the glorious Orin and gave him an excellent blade. He also returned the money.
13. Everything would be fine, but there is nothing to feed the dragon, so we sell it at the same market for a great price.
User Avatar
19 years ago
Auto-translated
fanat


FT2 fanat Walkthrough


1. Enter the body of water, kill the nearby pixies, and visit the body of water again.
2. Go and kill the second group of pixies near the nomad tent.
3. Leave only the snake in your army, collect the gold, and hire a nomad.
4. Visit the body of water and run to the prison. (You should have enough moves left.)
5. Free Orin, give him the artifacts, and reorganize your army so that the griffin remains with Sylvia.
6. Run with Orin to the oasis where the dwarves are standing.
7. Visit the oasis and kill the dwarves using the wall of fire spell. (The main thing here is to kill all the dwarves using magic only once.) Visit the oasis again.
8. Go to the Guardian of the Question, collecting 2 sulfur and gold along the way.
9. Complete his quest, take the artifact, enter the portal, visit the oasis, recruit 40 pixies, kill 100 of their brethren, visit the oasis, collect gold, and run to the portal that leads to the Free Guild.
10. Visit the body of water, enter the guild, sell everyone except one pixie, and go to the Guardian of the Question.
11. Proceed to the dragon, recruit him, and you will have Armageddon's Blade. (This is where I ended the walkthrough; I was so happy that I didn't even think about selling the dragon, but you can sell him if you collect the gold correctly in step 9.)
User Avatar
19 years ago
Auto-translated
Kamikaze


A walkthrough of the second stage of the Blitz Tournament "Desert Storm".

Since childhood, Sylvia dreamed of riding a real griffin, but she always considered it an unattainable dream. Then came the dream. It was so vivid, so real. Somewhere far to the east, beyond the northern swamps and the desert, lived a tame griffin. And her heart called her eastward...

First, we go to the OASIS (specifically, the rightmost location) to replenish our movement points by 400.

Next, we move left and... encounter spearmen who don't want to join Sylvia's great army. But we don't need freeloaders; we need MP.

After the battle with the spearmen, we gain another 400 MP and head east towards the NOMAD hiring agency. However, we are met by friends of the freeloaders, and one of them, seeing his friend's spear in our warrior's hands, shouted to his comrades: "Get out of here, you guys! They killed ours!" He was wrong. In an unequal battle, Sylvia had a Dragosmy, and our army simply crushed the hot Finnish...spearmen.

And here are the nomads... well, they have no money. What a predicament. "Hey guys, look, there's some loot lying on the road, probably what those losers dropped," said one observant soldier in our army. We couldn't hire the nomads, only enough gold for one "horse." But as it turned out later, this was quite sufficient for successfully completing the task.

The Dragosmy didn't really like the presence of the new member of the expedition, but the spearmen outright refused to travel together with the "black beast." So, we were left without spearmen... but who needs them? Our path led north to the sands of this wonderful island. But first, we need to visit the oasis again to replenish our strength (+400 MP).

Oh, that swamp... it took away half of our movement points. But here is the desert, the "blessed" desert... but tough luck, desert; we have an Arab face, and it will help us. In its last breath, our brave squad, consisting of two units, crawled to the grassy surface and... before our eyes stood an old, dilapidated prison – yes, indeed, a prison.

But where is the griffin from the dream? Only the prison can give the answer because there is nothing else in the area. And so Sylvia decided to free the prisoner from captivity. "Tomorrow morning, I'll get started," she said to herself. "No way, you're starting right now," said her inner voice. Anyway, Dragosmy had something to do. His acidic saliva greatly helped Sylvia in freeing the prison inmate.

And lo and behold, a knight in shining armor on a leash led a heavenly beautiful beast. The griffin turned out not to be wild at all. As it turned out, Sir Orrin was heading further east for his own affairs, leaving Sylvia with the care of the beauty in exchange for the Dragosmy and the sand warrior.

Sir Orrin, a master of fire magic, never refused additional profit, and here, rumors spread in the oasis (+400 MP) that gnomes were guarding untold treasures to the southwest. The battle turned out to be very easy; may fortune smile upon the "fire wall." The stupid gnomes simply tried to walk through ice and flame. It didn't work... too bad.

On the way back, we had to visit the oasis again (+400 MP); we need to let people know that the treasure is in "good hands".

Few knew that the Warrior of Light's main goal was the Necklace of Heavenly Bliss (the old man didn't want any heavenly bliss), but this is why the army moved across the desert northwards. Being a good mage, Orrin possessed decent intuition, so he spent some time collecting SULFUR, which he found in the desert.

And surprisingly, the sulfur came in handy. Two mages set up a holographic tower and removed the spell using rare reagents for future experiments.
Oh joy, the squad – well, the tame Dragosmy and the Arab sand walker – found their treasure.

Then Orrin decided that it would be a sin to stop there and decided to enrich himself just in case. Without much thought, the travelers rushed into the teleport... and ended up near a magnificent oasis.

Forty good fellows offered their services to the dirty wizard, and he wasn't stupid enough to refuse... intuition, brother.

And now, all these marauding rascals decided to collect money, neatly stacked right in front of them. However, they had to kill about a hundred other beautiful adventurers in the process. They had already managed to steal 2 rubles.


And then the cunning Orrin, completely losing his mind from wealth, put his warriors in a trance and sold them on the slave market, along with the snake and horse. Then he took all his savings and bought a ticket to the Dragon Zoo.

And in the end, he got his money back and even privatized a cool sword.

THE END
User Avatar
19 years ago
Auto-translated
Perpolken


Walkthrough by Perpolken:
1. Visit the spring and recruit 20 pikemen simultaneously.
2. Kill 20 pikemen and visit the spring again.
3. Enter the monolith, take two piles of gold, and kill 100 pikemen.
4. Take the 3rd pile of gold in the bottom row and recruit pikemen.
5. Visit the oasis, take the necklace, and enter the portal!
6. Visit the oasis again and take all the remaining piles.

Statistics

Welcome our newest member: recijeb